
My Photography Blog
Welcome to my photography blog, which is where I hope to share some of knowledge and experience so that you can all benefit from it. There will be something for everyone from the beginner to the advanced photographer and some stuff for people who aren’t photographers, but need to buy a gift for a photographer or who just want to understand a bit more about what we do and we are so obsessed with it!
I hope that you find them either useful, inspiring or both. All of the links in the blog which link to Amazon are affiliate links, so if you make a qualifying purchase after clicking one of theses links, I might get a small kickback and this always helps out so thank you in advance.
If you’d like to me blog about a particular subject or idea then let me know and I will get it done it done (within reason!) in a future entry.
Enjoy!

Photographing Sunrise and Sunset in The Lake District
A handy guide to some locations to photograph the sunrise and sunset in the Lake District.
This post has been sat in my drafts for ages as I wanted to add more to it, but if you’ve seen my other post, then you will understand why I am posting it now, I’ll do another post later in the year when I have some more to say and have shot some other parts of this incredible part of the world!
Photography at Sunrise and Sunset can be one of the most rewarding and yet most frustrating pursuits in photography, largely because it often relies on a huge sprinkling of luck alongside some careful planning around where to be and when to be there; that awesome golden hour light doesn’t always show up! I hope in this post, to give you some ideas for your next sunrise or sunset photography trip in The Lake District.
Before we start, other than your camera and tripod, here’s some things I recommend taking with you:
Head Torch - these trips start and/or finish in darkness or poor light, this well help you to light your way.
Layers - it’s cold before the sun comes up and gets very chilly wet the sun goes down. Stay warm
Water + Snacks - stay hydrated and don’t get hungry. Plan to take enough for your whole trip. And then a little bit more.
Not something you take with you, but always make sure someone knows your plans in case there is a problem.
Remember, that no amount of planning is going to guarantee you that dramatic sunrise and those amazing golden colours. You’ll improve your chances of getting ‘the shot’ if you’re in the right location and at the right time - something I learned quite quickly when I moved to the area and something which I am still learning now. I use the Photopills app to help me plan these trips. There’s also a called Alpenglow which is starting to get really good at forecasting the quality of a sunrise, but I still don’t rely on wholly on it and like to take a chance!
Here’s a list of the locations covered in this blog:
Blea Tarn
Ullswatwer (Glencoyne Bay)
Helsington Viewpoint
Rydal Water
Elterwater/River Brathay
Ullswater (Pooley Bridge)

Blea Tarn - Sunrise
This has to be one of the most beautiful, most peaceful and easy to access views in the whole of The Lake District.
The tarn is located about a 300 meter walk from the National Trust car park (free parking if you’re a NT member), a really easy walk and the pay off is huge! A word of warning however, the car park is accessed via a steep (1 in 3 gradient) road from both sides of the valley. The road will be largely impassable when the weather is poor/icy/snowy so bear this in mind before you set your sights on a winter shoot here!
The walk from the car park is easy, but can be very boggy underfoot when you leave the path, so make sure you’ve got decent boots on.
This is a popular spot with photographers owing to the mirror-like reflections of the Langdale Pikes in the stillness of the water.
My visit was in mid-septmeber, and as the year progresses the sunrise moves further round to the east until it begins to track back again over the winter months.
If you’re lucky enough to be here on a still day then you will be rewarded with those super-sharp reflections and don’t forget to pack your polariser!
Blea Tarn National Trust Car Park
What3Words Location: fires.bolts.stammer

Ullswater - Sunrise
Ullswater is another easily accessible location for photographers, with a National Trust car park conveniently located about 50 meters from the shore.
This location provides panoramic views of the Eastern Fells of the Lake District.
There were a number of other photographers here the morning that I visited, which is testament to the beauty and peacefulness of the location, but it does mean you’ve got to work hard to get something unique!
A word of warning though, the midges here have a real taste for human so make sure you’re covered up or have some repellent spray with you.
National Trust Glencoyne Bay car park
What3Words Location: live.trying.sketching

Helsington Viewpoint - Kendal -Sunset.
This is a little gem which is a regular haunt for me as it’s not far from where I live! Great for those who don’t like to walk too far as you can park up, get out of your car and shoot!
The views here are dramatic and span all the way from Morecambe Bay in the West extending right across much of the Lake District, with foreground provided by the River Kent and the Lyth Valley.
The car parking here is free and you can stay as long or as little as you would like. There’s also a really lovely church if that’s your kind of thing too.
Car park at the Parish Church of St. John
What3Words location: taken.stroke.king

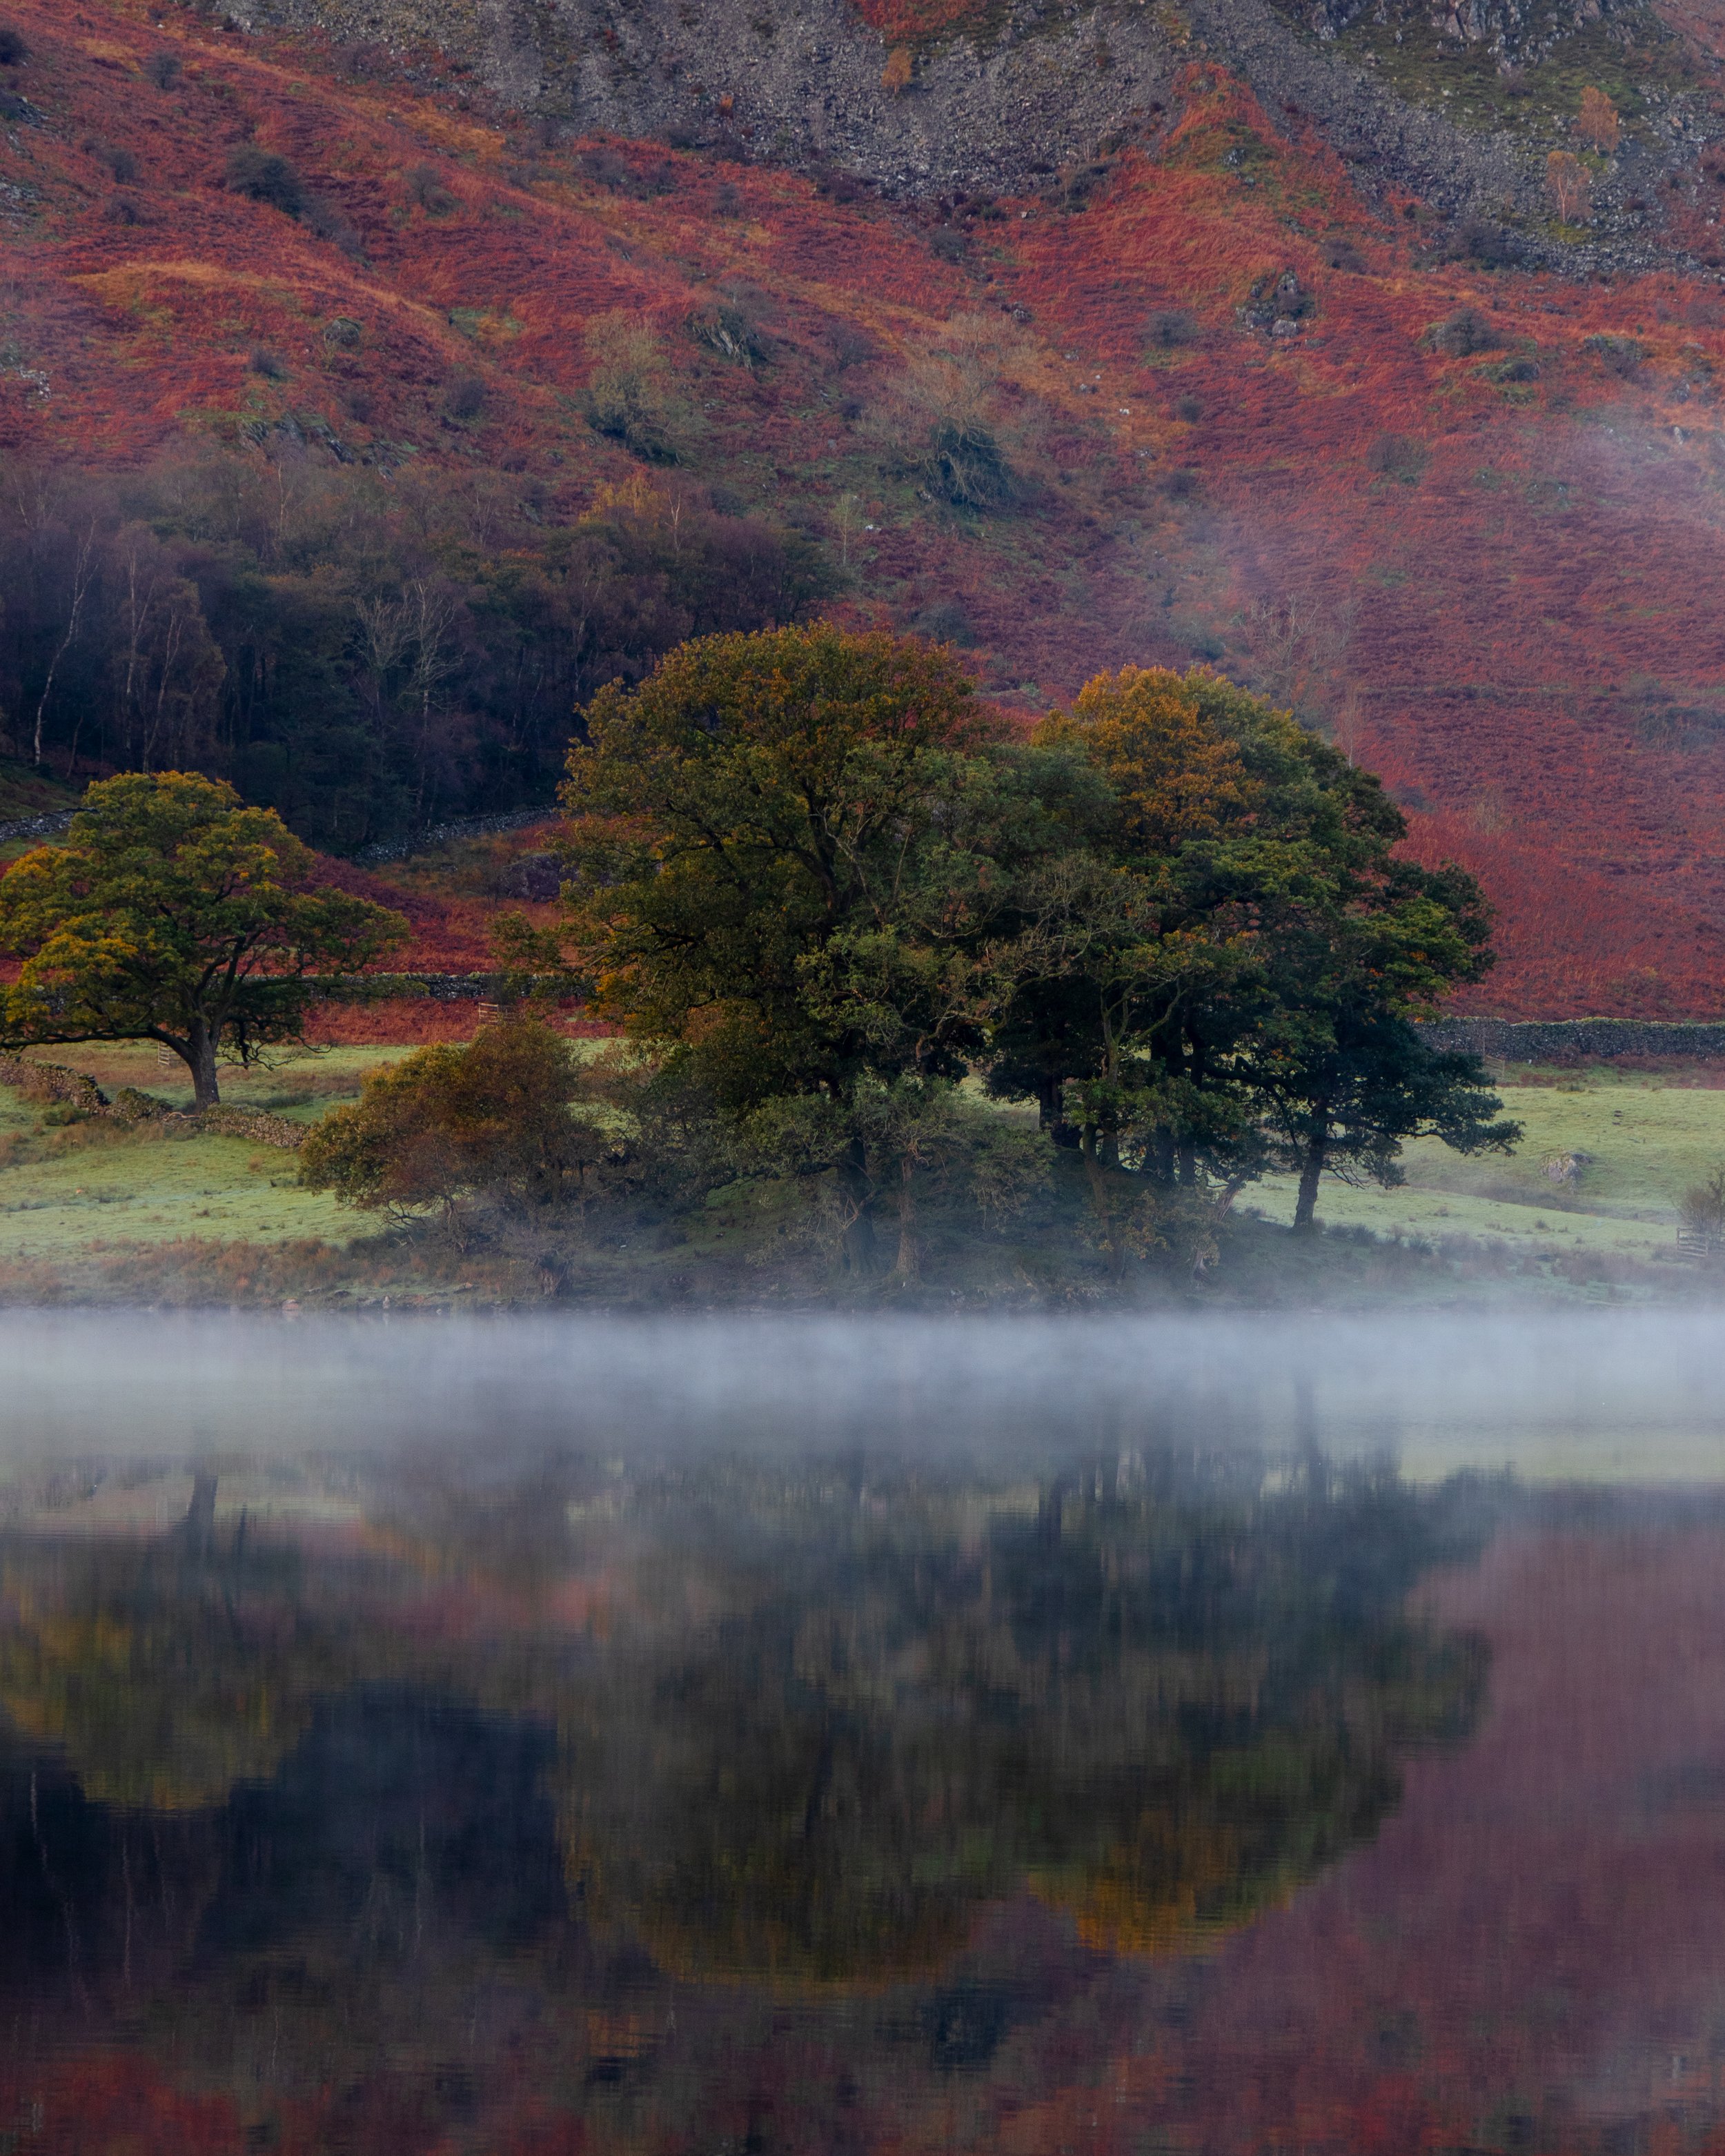
Rydal Water - Ambleside -
Sunrise.
This is another location which is easily accessible and there is a ton of great compositions, but you’ll need to hunt for them. There’s handy parking which is located at White Moss Car Park, which will set you back £5 (you can pay by card if you’re not a fan of carrying cash). When you leave the car park, turn right and walk back along the footpath which runs alongside the A591 and you’ll soon be in amongst the photography!
The walk here is flat and there is nothing to push your limits, definitely an easy walk, with the occasional incline and you can walk as far or as little as you wish. I covered about a total of 1km there and back. A lot of compositions can be shot from the footpath, but if you want some different foreground interest then be prepared to climb a couple of walls and fences.
This one is worth a scouting trip before you go as the best compositions aren’t always apparent when you’re walking in the dark lit just by your head torch!
This isn’t the most peaceful spot as you’ll have the early morning traffic to contend with, even you venture closer to the water so don’t expect the soundscape to match the tranquility of the landscape.
What3words location: tint.eagles.whizzing
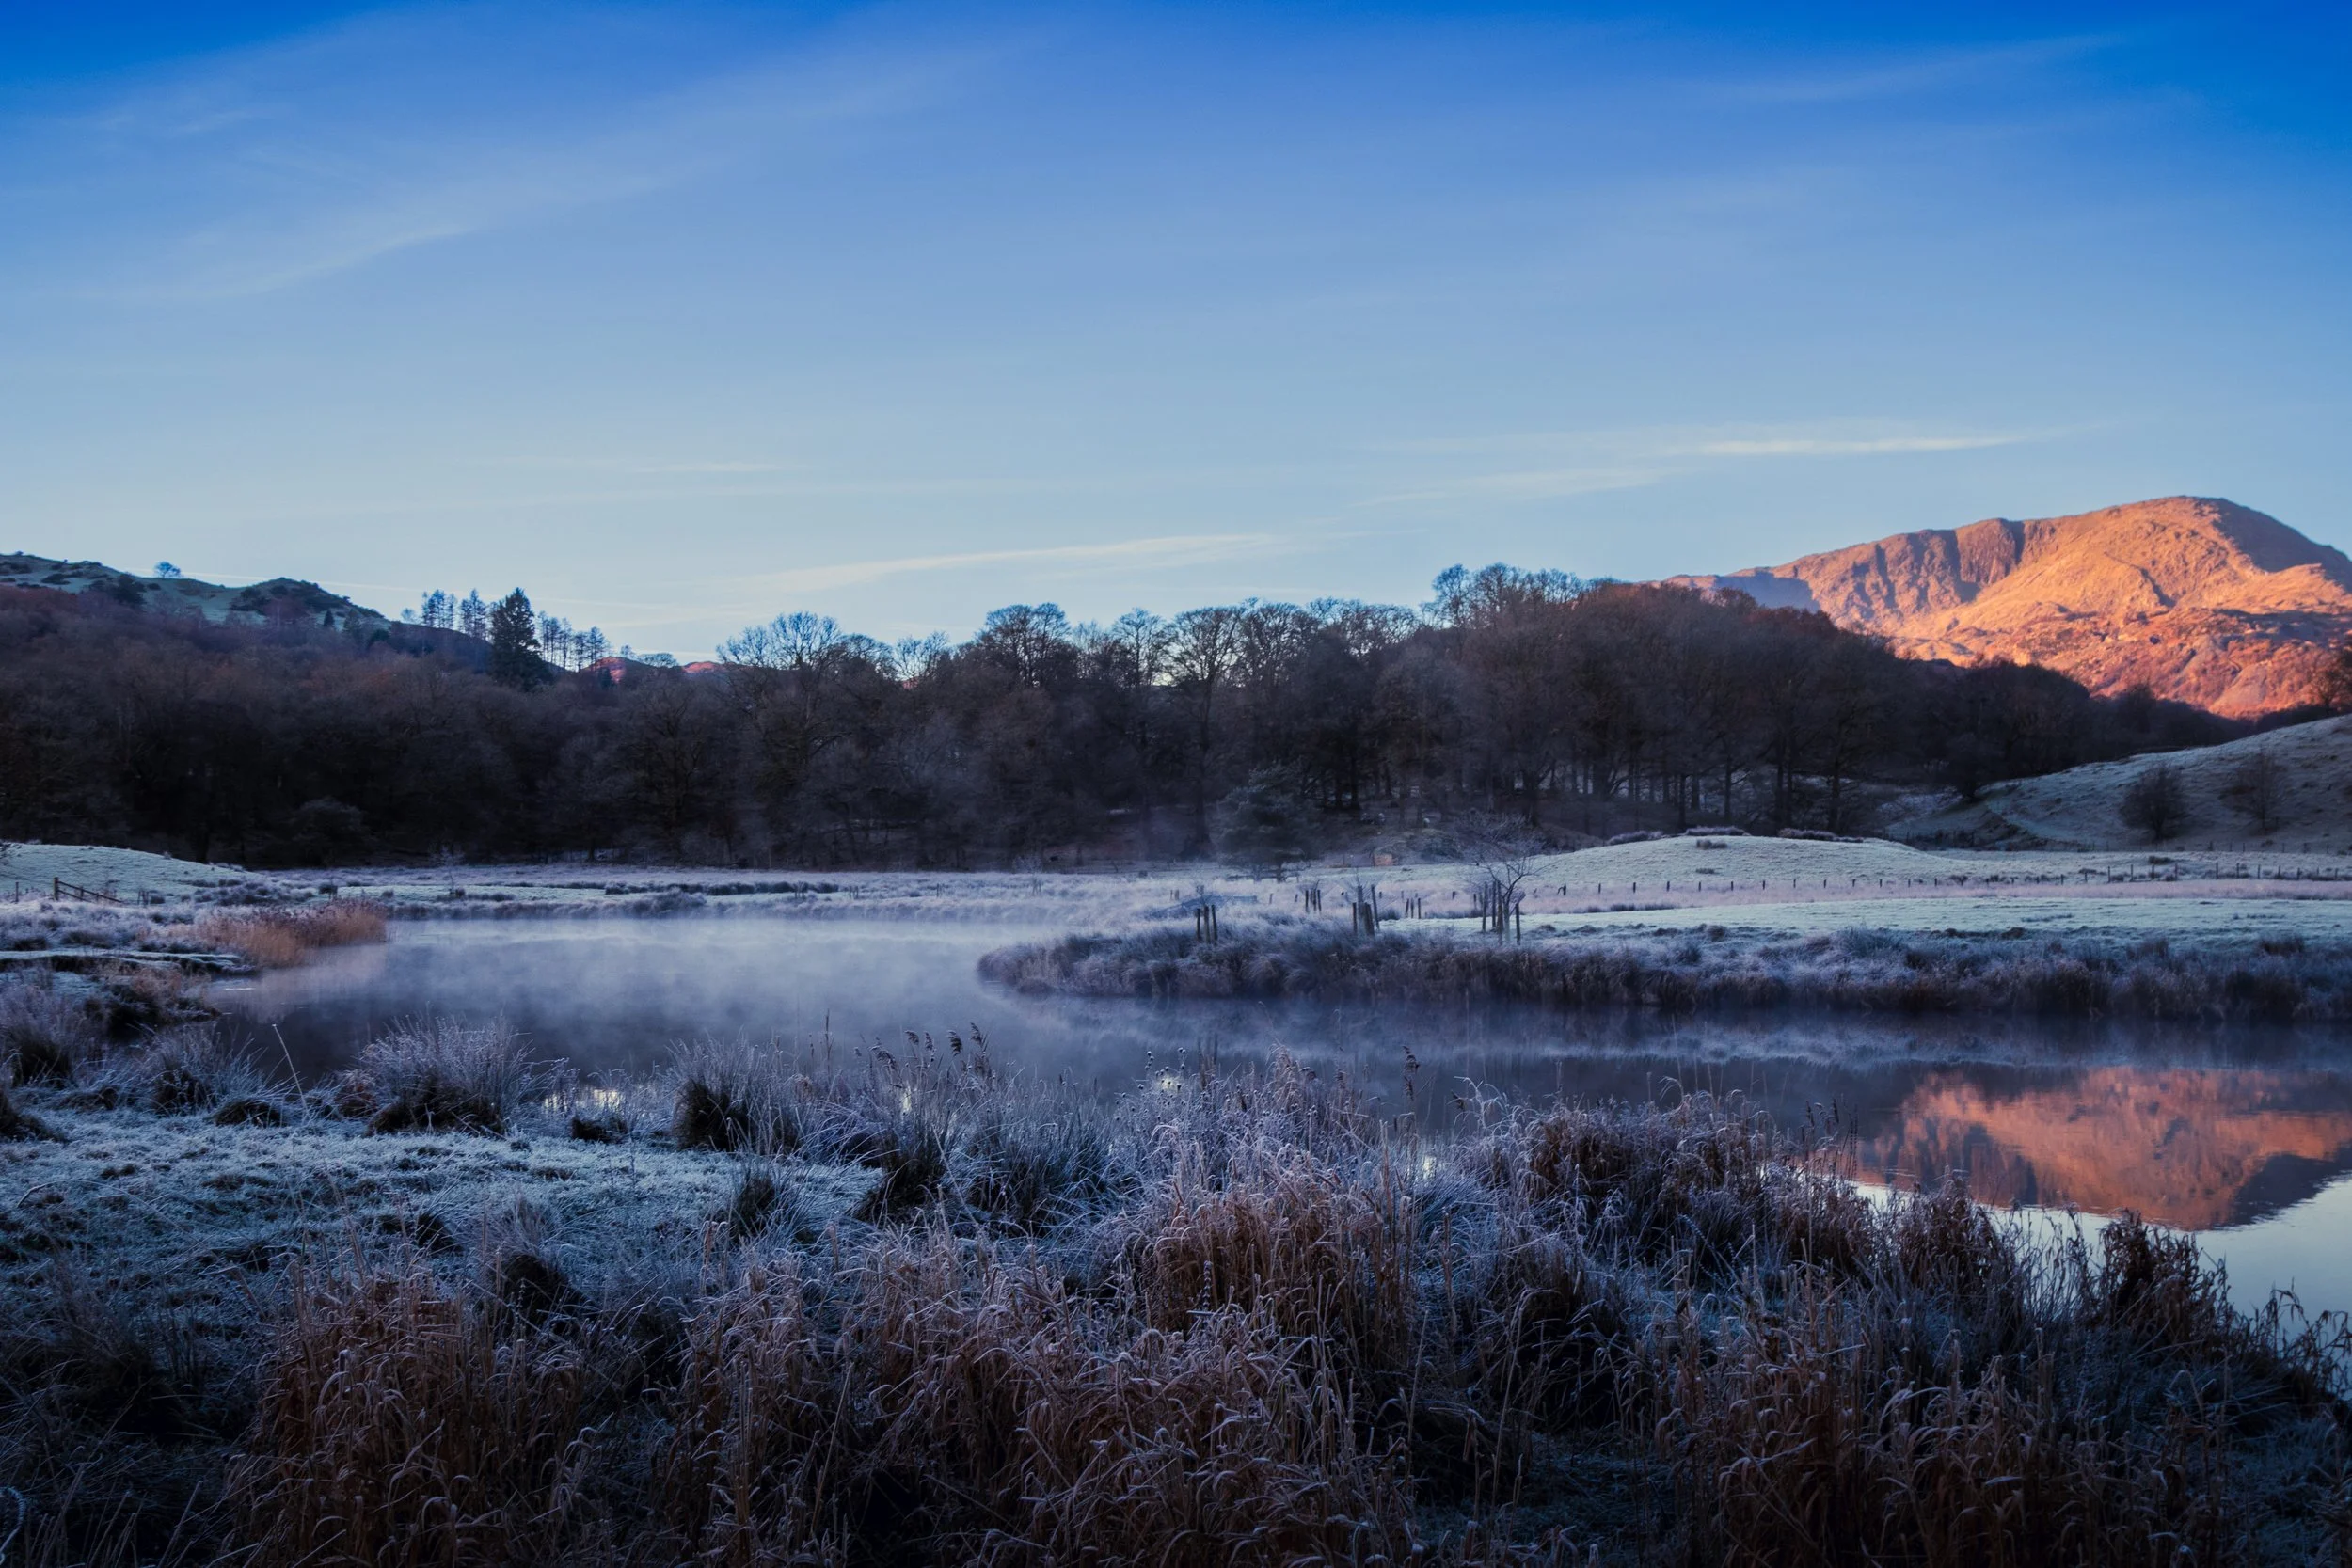
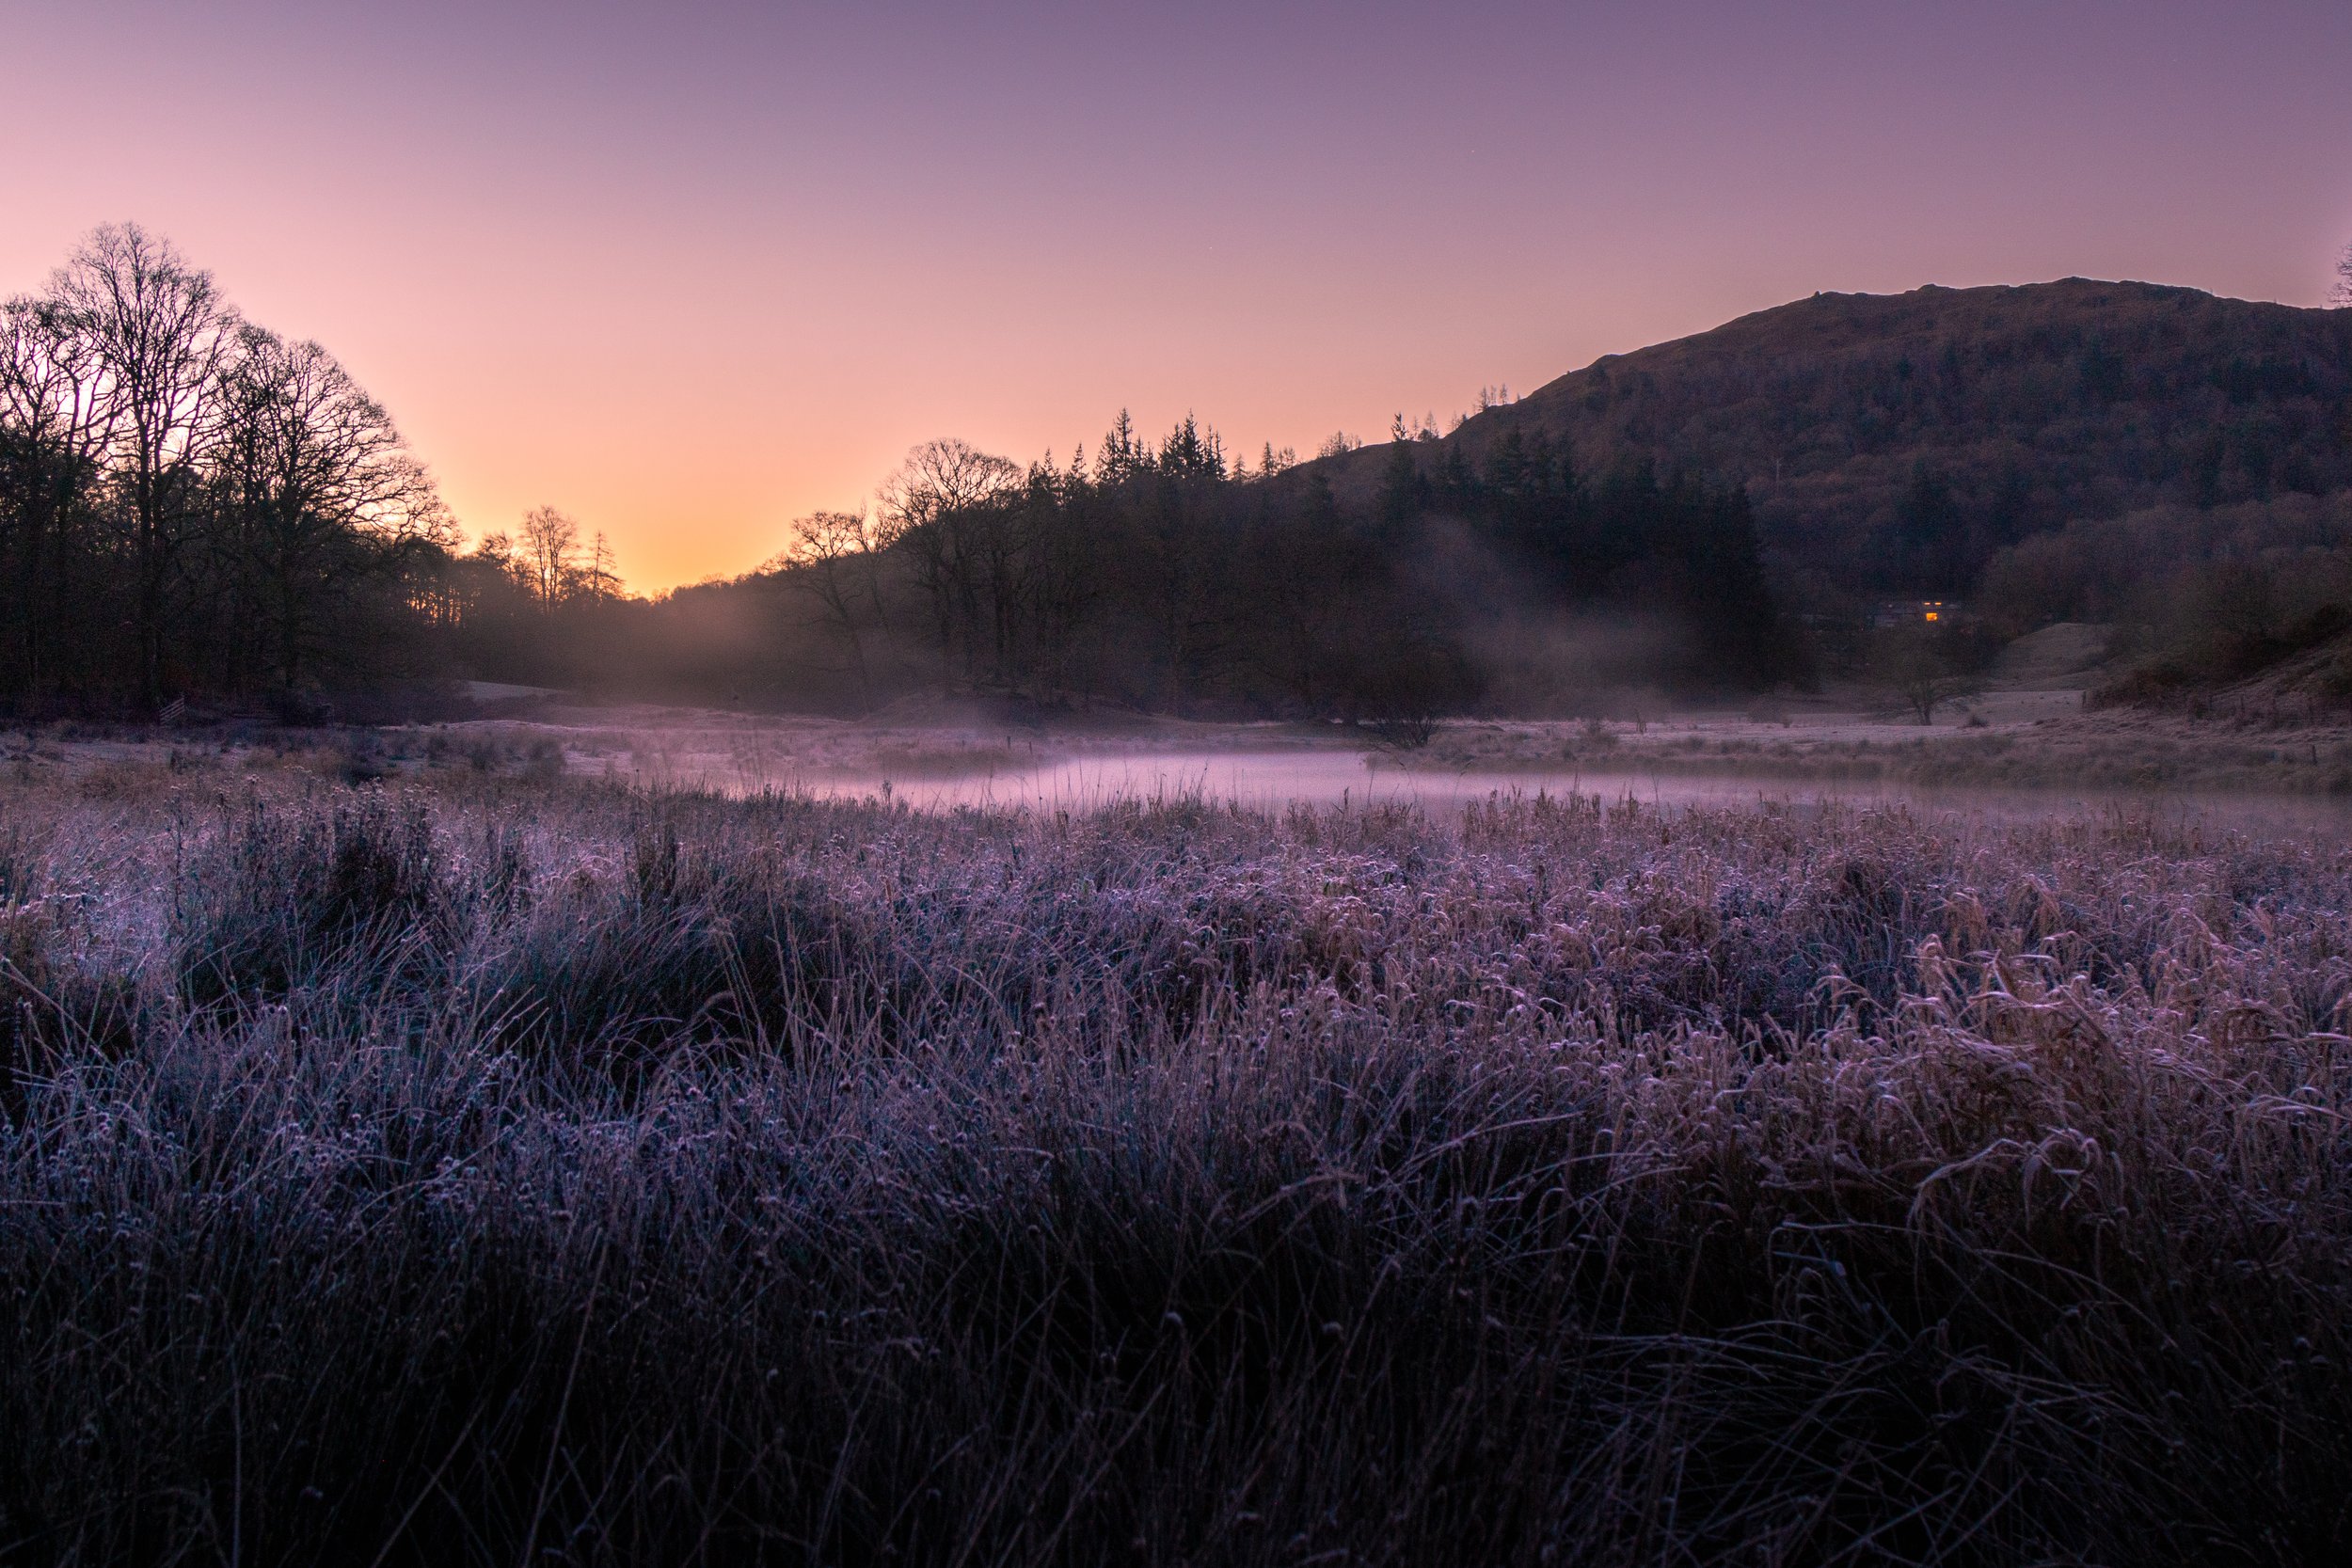
Elterwater and The River Brathay, Ambleside.
You’re probably noticing a trend in these entries (I am!) that many of these locations are pretty much “drive up” and are easily accessible, and that’s no different in this one! Elterwater turned out to be an incredible morning’s photography.
Arrive early and park Silverthwaite Car Park (£2 an hour and cards are accepted), just off the B5343. I arrived at just after 6am but minutes later it was starting to fill up. From here, leave the car park, go straight across the road and follow the short woodland path until you hit the the gravel path which runs alongside the The River Brathay.

The gravel path is easy terrain, but be careful in the woods when you’re up and about in the early hours - your head torch is a must!
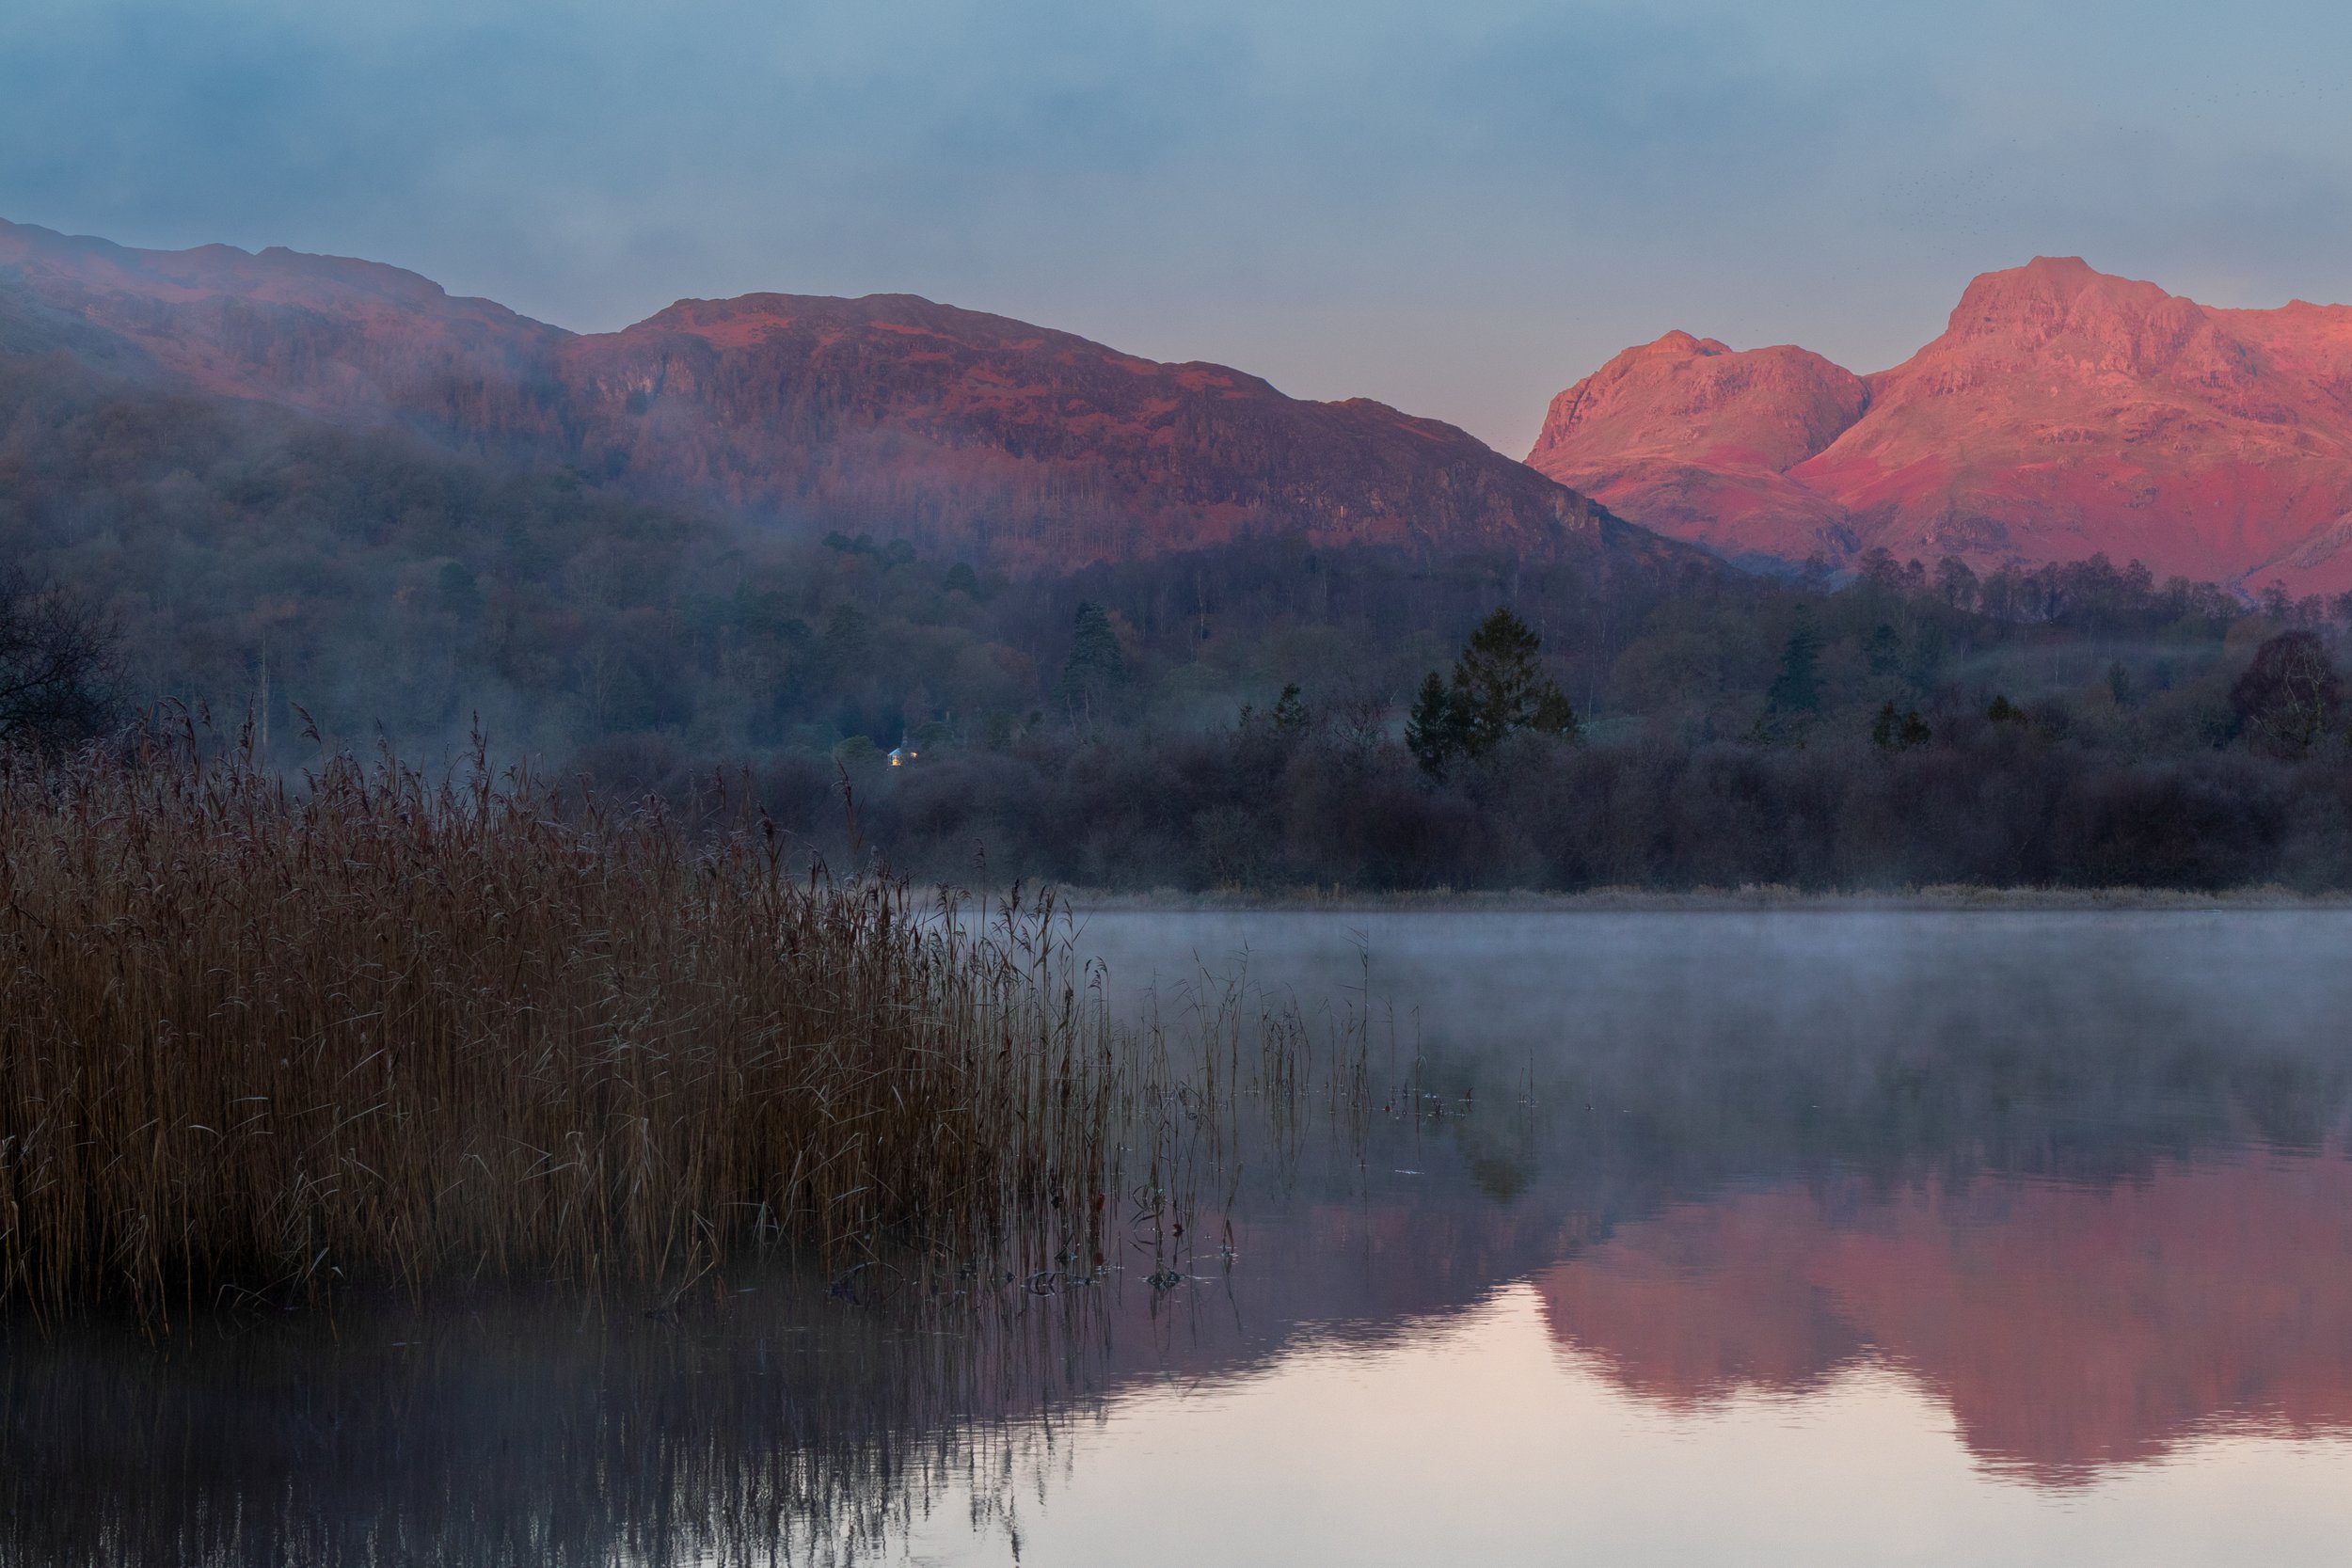
There’s shots galore along here and if you get the mist and a whisper of breeze then you’re golden. Around a 500 metre walk will see you arriving at Elterwater, where you have amazing views of the Langdale Pikes which are reflected in the water.
The sunrise in November is practically opposite the Langdales and if you’re lucky then the sun will light those peaks up like fire!
It’s much more peaceful than the previous spot at Rydal Water and there’s even a few Herdies knocking about in the neighbouring fields!
what.3.words hourglass.universally.sparkles (for the stones)
what.3.words perplexed.succumbs.curated (car park)
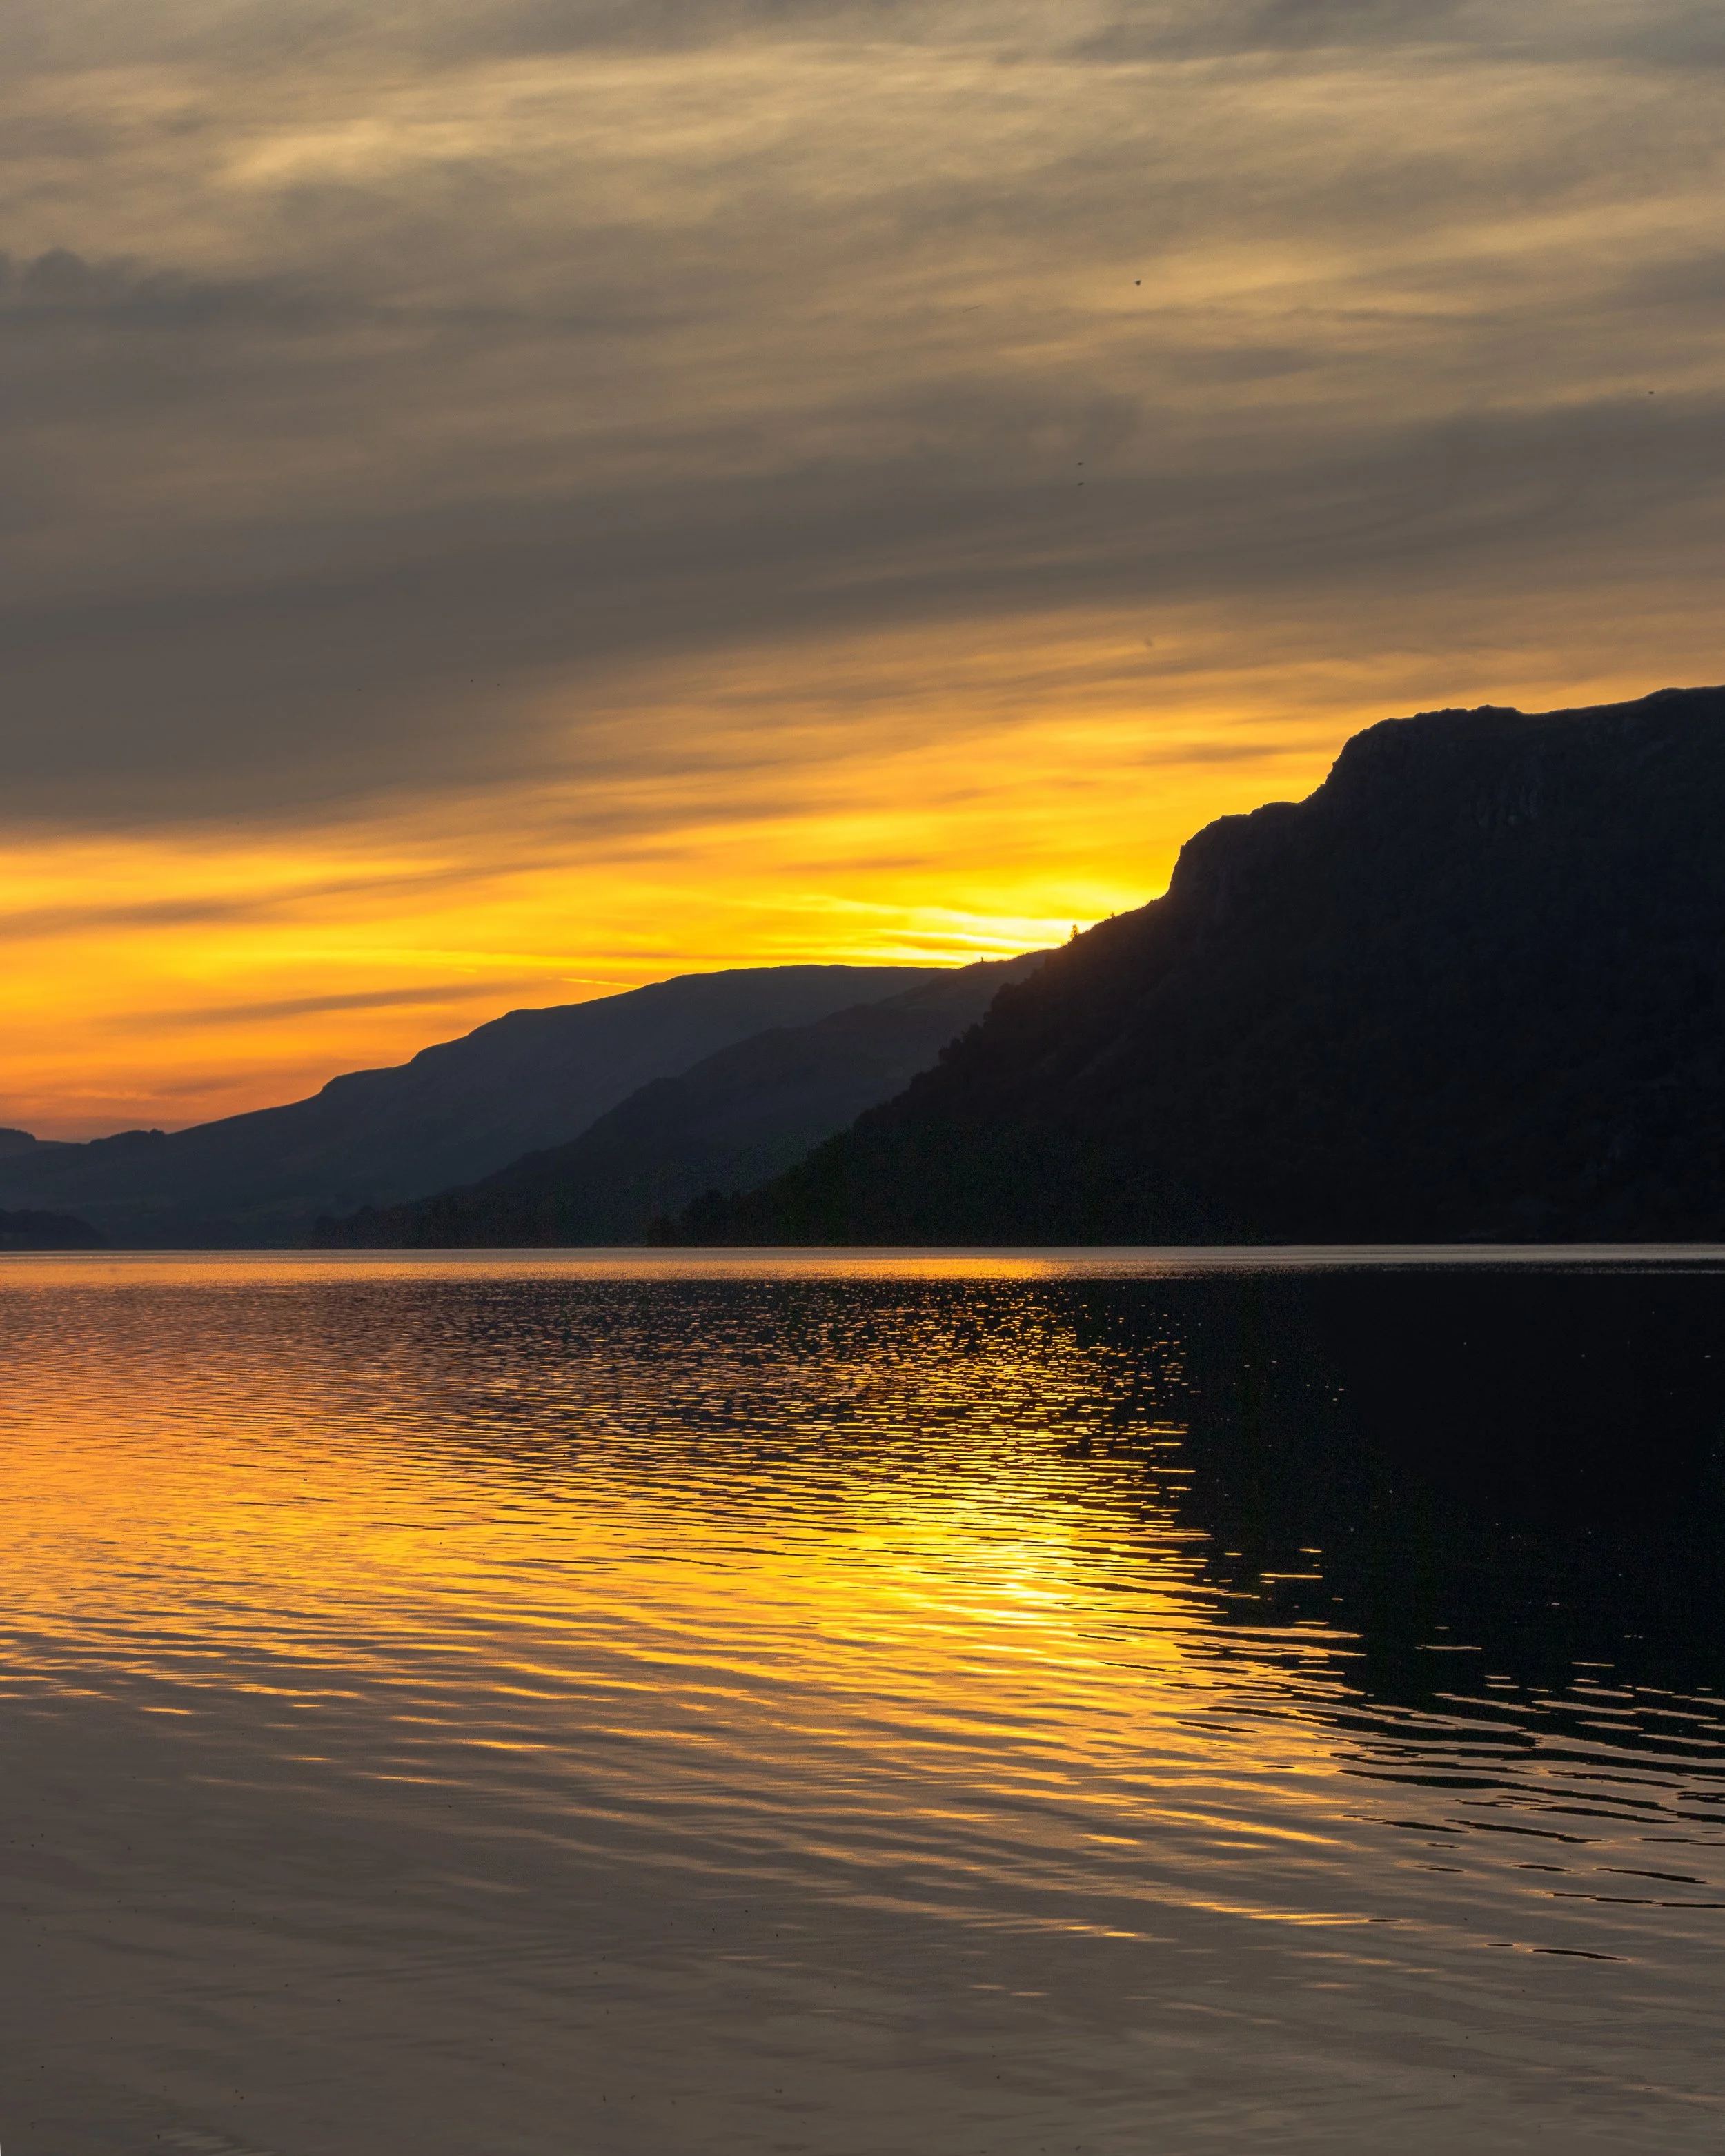
Ullswater - Pooley Bridge - Penrith
Yet another easy walk, but not for the faint of heart in other ways - I’ll explain.
Parking for this one is easy, there’s plenty in the Pooley Bridge area (it get’s very busy, so just because it’s there, don’t expect it to be easy to park!), so have a look around and see what suits you. I managed to find something in a lay-by so didn’t have to pay for this one! Everything around this location is fairly well paved, but that does mean you have to walk along roads without footpaths, and a couple of the locations you can stand are on grass verges - BE CAREFUL, WEAR SOMETHING BRIGHT, DON’T STAND HERE ALONE AND KEEP YOUR WITS ABOUT YOU! (Disclaimer - you have been warned, if you get run over, it isn’t my fault!). If you don’t fancy this, then there is an elevated spot in the carpark next to the B5320/A592 junction (W3W location below at the end of this section).
The shot everyone wants is The Duke of Portland Boathouse, and to get a decent shot of this, you’re going to need either a super long or have to take your chances with the traffic (again, be careful, you have been warned, not my fault, I’m not telling you to do this!) and get close to the fence.
This is a good sunset spot, with the sun setting behind Helvellyn the evening I was there. Unfortunately, the sky didn’t give me everything I wanted that night, but it still had a go at putting on a bit of a show!
What.3.Words: contemplate.enacted.length (paid parking) /// magically.leopard.code (free lay-by parking) /// pacemaker.estate.sticky (dodgy grass verge photography) /// ///juicy.narrow.sprouting (safer, slightly elevated views of the water)

I’ve been having some time out….
(and NOT because I have wanted to!)
This isn’t an “I’m stuck in a creative rut” or “woe is me post”, more of an “when other things get in the way” post!
Since the New Year, I haven’t really posted anything on social media, nor have I written much for this blog or done anything new on the website! I haven’t been out to shoot for a few weeks either but have done some stuff in the studio (and a freebie for work doing some headshots).
Why? Because sometimes other things get in the way… namely work and having to go out and earn money doing something other than selling my prints on here (it’s not very lucrative and I know that selling landscape photos is a saturated market with a whole lot of talented photographers out there!) means that sometimes photography has to be in the passenger seat, although I would prefer not to be. Ultimately, I am still a stage in the game where (what I call my) real job finances anything that I want to do or achieve photographically.
I am trying to see positives in this, but what I am realising is that this has been a good thing for my photography and using this lack of time to go and shoot as a way to make me think about developing aspects of my work that don’t often get a look-in as well as trying out some new things.
I have used some of the time I’ve had to make plans, scout locations and to upskill my editing, which is something I have been wanting to spend time on for a while. It’s been quite fun (and a real challenge) finding raw photos online and then editing them. I’ve done a couple of editing “challenges” where you have to edit other people’s images and I find this a real hard task to complete – not least because I find that the raw image files behave so differently to each other, and the ones I get out of my own drone are no exception!
I’ve also worked on a couple of studio-based shoots, but nothing that I am ready to share yet – one of the things my time out learning new editing tricks has taught me is that my still life game needs to be upped and I like the idea of that challenge.
If you find yourself in a similar position, then here’s what I have found has helped me to maintain my interest, develop parts of my skillset and think of new ideas;
· Learn from other photographers; find ones you like and study them – watch them on YouTube, read their books and look at their work. I have found some of the most insprigin stuff I have seen has been in photobooks; what is there in your niche and what can you differently!?
· Develop your editing skills – I knew my photos were missing something and I have been working building the Orton effect into my workflow and identifying images where it will work.
· Visit somewhere new; I have been pinning locations I want to visit onto a Google MyMap and this is something that I will try and tick things off during the Easter break and the summer holidays (Yes, I’m a teacher!).
· Explore something new in photography. I worked on studio projects, you might want to try something else! You don’t need to spend money – maybe you could work on your portraits, or if you live alone work on some pet portaits or even explore the idea of self portraiture. The latter is probably one of the most difficult projects to embark on and not just because you have to take photos of yourself, but you have to take photos of you… I’ll leave you to unpick that!
Don’t let “real life stifle your passion for creativity if you can’t get out to shoot what you want to. Find new ways to be creative, you never know, you might like it!

From The City to The Country…
Just some thoughts on relocating from London to the Lake District and the impact it has had on my photography
It’s been a while since I wrote anything for this blog and now there are two posts in a week, its been busy in my “proper” job and now it’s half term, which is bringing some welcome relief and along with it, some time to write a couple of blogs and of course, get out with the camera and do some editing.
This year has seen a lot of change - a new job in a different part of the country, which is very different to where I was when I based in London. I loved London, but I really love where I am in the Lake District, in North West England. The change of pace is more than welcome, but it has present a number of challenges for me from a photographic point of view and that’s what I want to talk about here today!

London was great, like really great. More importantly for me, it’s where I fell in love with photography. I took a few shots on my phone, enjoyed editing them and they were well received by friends and family, as well as a small amount of followers on “The Gram”. I eventually took the plunge and went out and bought a DSLR - my trusty Canon 80D.
It’s the camera I still use now for just about everything I do (something new on the horizon, but nothing is cheap so it might a be a very distant horizon!)
I soon got into street photography, cityscapes, urban photography and quite quickly realised that night photography and stuff in low light was what I wanted to do. I became obsessed with shallow Depth of Field (DOF), bokeh and long exposure. Bright lights, bright colours and lots of playing with colour temperature were my go to edits. I loved a light trail!

As time passed and I spent more time out of London, making images in the Derbyshire countryside I realised more and more that I wanted to be back out in the country, have a slower pace of life and focus on creating landscape images and continue to dabble in wildlife photography.
The transition from town to country has been amazing and I love the slow pace of life, but it’s been a steep learning curve in terms of photography.
It’s a game that we’re always learning in, but this move has made me realise just how much I still have to learn. The landscape photography style is incredibly different to the way I used to work in London. Here’s some of the things I have learned, present in a bit of a “compare and contrast style”!

Composition is King… but in a different way that I used to find when shooting in the city. One of the things I have learned shooting landscapes is that foreground interest is one of the keys to a successful image. Leading lines are something which I have been able to transpose from one genre into the other, but leading lines in nature need more work to help them make sense in an image, this was easy in London because they were such an integral part of the built environment and designed by engineers and they like straight things!
Focus Stacking… This is something that I used to do when I was in city, but not to the extent that I have done since I have been shooting landscapes. Even at the class f/8.0 it can be tough to get the whole scene in focus, so to really nail that corner to corner sharpness, being able to focus stack is something that you should be able to do.

Dramatic Light… When you have it, it makes everything almost easy, when it’s not there, you have to think on your feet and you have to think hard! It’s very wet in this part of the world, which means it’s often very cloudy, and quite often there is rain falling from them but with clouds, come shadows and breaks in the cloud and when those conditions hit with the sun then it’s just photography heaven!
Given the amount of night photography I did in London, this wasn’t something that often troubled me, but rain always added the element of reflection which was a welcome addition. Oh and when the sunset or sunrise kicks off in the Lake District, well that’s just something else!

Sunrise/Sunset… Golden hours, need I say more? Invest in an app like PhotoPills so that you can find the best places to be for those sunrises shots, and if you can get up high in the hills (safely!)and can see a sunrise and a cloud inversion in all one then you’re in for a real treat!
Dynamic Range - You’re likely to (depending on your camera) need to shoot some HDR stacks to capture as much dynamic range as possible, especially if you are shooting in harsh light or it can be hard to capture all of the detail and you’ll end up with crushed blacks or blown out highlights. Be careful though, it can make your images look “digital”/artificial, so what you do in post is key with these.

You don’t always need to shoot the whole scene…
this is something that I am still working on. With such wide views and incredible scenes, it’s always tempting to try and shoe-horn the whole scene into an image. Sometimes I will try and leave the wide lenses at home and this forces me to try focus on parts of a scene rather than the whole view. Pick out details and find the interest, give your viewer something to look at! This is very different to what I used to do a lot of in London, which focussed a lot on having the subject in the foreground and using this to force the DOF and create all of that magic bokeh-sauce!
So what’s the take-away from this? I suppose that my overarching point is that you don’t stop learning. No matter how good you are or what you shoot, there’s always room to improve, to develop and to grow - if you don’t think you have anything to learn then you won’t get any better; that’s the only given there is!
I’ve developed a huge amount as photographer since I moved, but you don’t need to move to get better, but get out of your comfort zone and go an shoot something different, you never know, you might enjoy and you might learn something new…

Why I Love Photography
This blogs looks at some of the reasons I love photography and explores the reasons that I don’t think I will ever stop doing it… or spending money on it!
(And why you might enjoy it too!)
This blog contains affiliate links.
I am going to start this with a caveat… this pursuit, like so many others, if you’re not careful, can end up being an absolute money pit; you have been warned! (But also, it doesn’t have to be that way).
I came to photography quite late. About six years ago, shortly after I had moved to London and got some lovely feedback from a few friends and decided to give it a bit of a go; things have just snowballed from there.
Whatever it is, the way you tell your story online can make all the difference.
But what attracted me to it in the first place? Ultimately, I am a bit of (a lot of!) a nerd and photography certainly scratches that itch. I’ve always loved a nerdy hobby - I have studied music since childhood and play the trombone and piano (both nerdy!), I used to DJ (yes it looks cool, but it’s also massively nerdy!) and play the odd round of golf here and there (nerdy with a side of frustrating!). Selling my DJ equipment financed my initial foray into photography and I haven’t looked back.
My first equipment was my Canon 80D with an 18-55mm f/4 kit lens and the cheapest tripod I could find on Amazon. I also got a bag to carry it all in and off I went. You can have a look at the gear I am currently using by checking out the ‘My Gear’ page. You’ll see that the 80D is still there!

I started out whilst I lived in London and got really into night photography, long exposures, light trails and playing with depth of field. The result of this was that I got really good at taking photos at night, but was hopeless at it during the day - both styles are very different beasts.
This leads me onto the next thing that I love about it - you are always learning. In the real world I am a teacher (Music if you’re wondering) and place real value on being able to teach young people a new skill, but also an equal weight on learning new things so that I can pass this on as well. Moving to the lakes has presented whole new set of challenges and means that my passion for the medium has developed further still and I am constantly learning and adding new skills to my arsenal.
YouTube is a great resource for learning about how to use your camera and how to post process in applications like the Adobe Creative Suite - find someone you like and who interests you and then go and put it into practice. Try to not end up down a rabbit hole though, if you spend too much time here, you won’t have time to go and do something with the learning you have done. You will learn more by going out and making mistakes than you will if you sit in front of a screen watching someone tell you how to do it.
I also really like being outside.
My current location, right next to the Lake District National Park really helps me to want to get out there and the air is a bit cleaner than it was in London, but all the same, getting out and about in all weathers is something which has always and will always appeal to me. Being able to do it in such beautiful surroundings is just a massive bonus, but again, it’s another learning curve and I’ll write a blog about that in the coming days; let's just say it’s a big difference to shooting in the city.
People have always been a big factor in my love for photography. I have met some awesome people who are incredible photographers whilst I have been doing this; I will link some of them at the bottom of this post so you can check their work out! Being out on your own can be really liberating, but having someone else to bounce off is always a great way to get out and shoot - you also never know when you’re going to need a model!

I’ve also managed to build out a nice little home studio; this happened during lockdown when I got really into Still Life and product photography. This is probably where the most investment has gone. Lighting isn’t cheap and decent lighting even less so. Then there’s backdrops, props and space to store it all. It’s a great place to retreat to after a busy stressful day!
The nice thing about being in the studio is that no matter where you are, you have (almost) complete control over the light, you just have to make sure monitors are properly calibrated!

Once you’ve taken your photos, you’re going to need to be able to edit them (God-tier nerding). You’ll need something like Abode Lightrom and/or photoshop which will require a subscription (there are free programs available, such as Photopea, which can be quite clunky but will get the job done) and then you might want to think about posting them on social media which is a time investment and then printing on top of that. If you then start shooting in a studio a lot, you might want to think about CaptureOne, which has awesome live capture abilities and really helps me to nail the compositions.
All that said, you shouldn’t let cost be a barrier to getting into photography. Find a decent secondhand body and lens from somewhere like MPB.COM and then get out there and see what you can do! And if you don’t want to do that, then we all have cameras in our pockets these days anyway…
Check out these photographers mentioned in the blog:

Gear Review: Lowepro Fastpack 250 AW III
In this blog I give my first impressions and a quick review of the Lowepro Fastback 250 AW III. Overall, not a bad piece of kit!
A solid, lightweight bag with only a couple of minor quibbles.

I’m going to do a quick review of the catchily titled Lowepro Fastpack BP 250 AW III, which from now on, I will refer to as the “backpack” or the “bag”!I bought this bag from Amazon as I wanted something that would work as both a camera bag and a day-bag for when I am out walking. Being the owner of a couple of other bags from Lowepro (the equally catchily titled Tahoe BP 150 and the ProTactic BP 450 AWII), they were really the only brand that were in the running for me. Admittedly, I’d been spoon-fed some social media ads before I made this purchase, so it was at the forefront of my mind when I was making the decision.It’s a well constructed, light backpack which comes in at around 1.5kg, which is a reported 33% reduction on its predecessor and it’s almost all black/dark grey, except for the webbing which is a stone grey colour and some orange detailing around some of the seams. The zips are solid and it comes with a grey waterproof cover. I am yet to test it out in poor weather, so will report back on that when I find out whether or not it passes the weather test! (Edit 14/11/2024 - it does ok in the wet, but you don't wanna get it soaked without the cover on!)
It’s fairly roomy inside, but the layout, even with some adjustments means that my 70-200 f/4 will have to live on my camera (a Canon 80D which is quite large; mirrorless owners may be a little luckier here) however, there is plenty of room for my 24-105mm f/4, my 18-55mm kit lens and my 10-18mm f/4.5 super-wide. If you want to take a drone, then this is either going in the top section of the pack, or you’ll be leaving lenses behind. Or just not taking your drone. My 50mm f/1.8 doesn’t make the cut if I’m going out to shoot landscapes as there just isn’t enough room. But maybe I just want to take too much kit. Better to have it and not need it and all that… The bag benefits from a “2 stage quick door”, which you can access easily by slinging the bag across your body for those quick lens changes, or when you need your camera 10 seconds ago.
This does mean that you lose one of the side pouches to allow for the access, but I feel like this is a small sacrifice to not have to take off my bag, lie it on the floor and open up the whole back of it. You do need to make sure that you know where the zips are and then take care when opening so that you don’t just pour your camera gear out all over the trail that you’re walking. So far so good though, and I appreciate the convenience that this is affording me.
Inside the bag is the stuff you would expect from a bag like this by Lowepro. The colour is a light grey with some orange details and I was really impressed with the feel of the updated adjustable dividers. These are now much more solid than previous iterations and feel like they will hold up a bit better when the bag is full. A decent sized front pocket adorns the top of the bag, and this will certainly hold your filters and the other photography accoutrements that we all seem to carry (camera tool, lens cloths etc). Those of you with smaller drones might find that yours fits in here, but there isn’t any padding and your drone case isn’t fitting inside.The laptop compartment is generous and well padded and should take anything upto a 16” laptop for when you need to do your edits on the go. My ipad is my go to for this now and this fits more than comfortably.The top section of the bag is a fair size and would allow you pack in a lightweight waterproof, small flask and something to eat. It’s difficult to say what will fit in here because we all carry different things, but the pictures should give you a bit of an idea. In summary, it’s a well built, well made bag, is comfortable to wear and provides quick and easy access to your kit when you’re out walking. The top “day pack” section is great and allows you to take out enough stuff for a day’s walking and the laptop section is well protected. I’d like to see some improvements to the strength of some of the clips. If you’ve got long lenses and a DSLR then you might want to consider something a bit bigger. Am I happy with it? Yes, absolutely! You can get yours by following this link to Amazon!At a glance:
Lowepro Fast Pack 205 AW III
Price: Currently available at good camera retailers from £95.00 to £115.00. I got mine from Amazon
Total Volume: 20.5 L
Internal Dimensions: 30 x 19 x 53 cm
External Dimensions: 31.5 x 20 x 54 cm
Camera Compartment Dimensions: 29 x 12.5 x 22 cm
Laptop Compartment Dimensions: 27.5 x 2 x 41 cm
Who’s it for?
Photographers who want to get out walking for the day, with a decent sized handful of gear but who also like to pack fairly light.
Those of you who want a decent sized bag at a reasonable price point.
Who should avoid it:
Wildlife ‘togs with a bunch of long lenses might struggle with the small size of the camera compartment.
Those of you who want to take the kitchen sink out on a walk and still have room to take some food and a waterproof.
Pros
Good sized camera gear section with a further decent sized day pack for clothing/food/drink or a drone.
Lightweight.
Solid construction.
Waterproof cover included.
Updated internal dividers feel much nicer and much more solid.
Cons
Uses of larger cameras and lenses may struggle with the smaller size of the gear section in the bottom of the bag.
Plastic clip on the chest strap looks a bit flimsy
Tripod pouch on the side isn’t over-generous so you might need to take something a bit smaller or attach it to the bottom of the bag using the supplied webbing.

5 Quick (and free) Tips to Boost Your Photography
In this blog, I talk you through five quick and easy tips that will help you to up your photography. Best of all, these are all free and are things that you can start doing right now with a small amount of effort - be sure to read to the end for the two bonus tips!
Nothing techy, nothing expensive, just 5 things that you can do today!

1: Shoot what you love and what you enjoy.
Don’t be a slave to social media and shoot what you think everyone else wants you to photograph. Photography should be something that you do because YOU enjoy it; i really believe that if you’re shooting what you enjoy, somewhere you enjoy doing it, then you will take better images because you will have more of a connection with your subject matter. It might be wildlife, it might be landscapes, it might be street, it might be commercial but it should be what you enjoy! I manage to combine my love of being outside with my photography, so I get the best of both worlds!
2: Look at the work of other photographers.
Read photobooks, look on the internet, soak it all up! You don’t have to copy everyone else’s work but it's useful to have inspiration and to see how other people compose images.
If you can avoid all of the other distractions, then using the internet to do this is a great idea, but know what you want to find and then go find it!
Some of my favourites are Nigel Danson, James Popsys, Scott Choucino (these three have really active social media and YouTube channels and I have learned a TON from them!), Galen Rowell and of course, the master: Ansell Adams.
These aren’t the only photographers out there, so find ones that you like and learn about their photography!

3: Talk to other photographers!
This is where I have learned more than via any other medium, other than actually going out and shooting. And let’s be honest, if you’re talking with other photographers, you’re probably out shooting anyway! Talking to other photographers and shooting with them is one of the best ways to learn, to get better and to develop your skills.

4. Be Present.
By this, I don’t just mean be there and be ready to get the shot. I mean be present in the moment, be aware of what is going on. Put your phone away, take the AirPods out, look and listen. Doing this meant that one a recent trip to a local viewpoint, I got to see things in the night sky that I haven’t seen before and it was really special. Allow of your senses to play a part in what you’re doing. Nothing beats being out early morning listening to the birds and watching the world come to life in front of you and capturing it with your camera.

5. Get out and shoot!
Make a plan and stick to it. Go out without a plan. But go out!
Some of my best shoots have been spontaneous, some have been the planned shoots, but they all involved getting off my behind and going out and doing the thing that I love. New years day last year was a really special one - I was up early and took advantage of the empty streets (I was still living in London) and saw one of the best sunrises I saw in all of my time in London. It was a great start to the year!
Bonus Tip!
Take lots of photos - I see so many people who have gone out and taken 10 photos on the same photo walks where people have taken 300. It pays to have shots in the bank, because the more you take, the more chance you have having something different or something interesting. Taking fewer photos because you “know how to get the shot” doesn’t make you a better photographer, it means that you get shots that other people miss.
Bonus Tip 2!
Know your camera. It should be like an extension of your body. READ THE MANUAL! Watch YouTube videos about your camera and find out everything it can do and then learn how to do it. There is nothing worse than seeing something amazing happening in front of and then having to faff about with your camera to dial in the settings meaning that you miss the shot. Even during the longest of golden hours, the good light can be there and gone in a minute (or even seconds!) and you don’t want to spend that time staring at your camera wondering why you can’t make it do what you want it to. Oh, and make sure that you’re shooting in raw so that you have the flexibility when you’re doing your post processing!
Keep Creating!
Chris

Does Photography Gear Matter ?
In this blog, I consider the perennial question “Does photography gear matter?”. This takes into account the different places to buy from, new vs secondhand camera kit, the grey market, what you need to get started and whether your phone is any better at capturing images than a dedicated camera set up.
Welcome to my first blog! It’s a cold, sunny, Sunday morning here in Cumbria so I’ve made a brew and sat down to try and answer the question “Does photography gear matter?”. This a question that will have ten’s of thousands of answers out there on the wider internet, and I’m going to share my thoughts here.
Where to start?
There are thousands of camera options available to you, just as many lens options, there’s all of the different filter and tripod options and don’t even get me started on bags (this is a separate blog all on its own!).
I get asked a lot “what’s the best camera?” or “what’s the best lens for portrait/landscape/street?”. The best answer I have heard to these questions and the one I like the best is “the one you already have”. Even if that’s the one that you have on your phone. Phone cameras are getting better by the day, and some of them even shoot raw images, which give you more flexibility when you’re editing.
But what if you don’t already own any camera gear and want to move away from your phone, where should you start, what should you get and where should you buy it from?
In truth, if you have a budget of, for example, £1000 (about $1200US), then you should (in my opinion) look to spend about half of this on your camera and lens combination. Why? Because if it breaks or you break it, it gets full of water or some other unthinkable thing happens to it then you have enough in the bank to be able to replace it. So the best camera is the one that you have and the one that you can afford to replace. I’ll talk about your first lens later.
Buying you first camera and lens is only the beginning. Once you have made this purchase, you’ll need to think about what sort of photography you’re going to do and the conditions that you’re going to be shooting in. If it’s anything that’s likely to be in low light situations, then you’ll need a tripod if you’re going to get sharp images, free of camera movement, which you can be proud of.
Then you’re going to need to be able to move it all so a decent, comfortable camera bag will be essential. So out of our remaining £500, we’ve probably just spent another £50-75!
But what about your lens? This is an important decision. The quality of your glass is important and is probably one of the things that will have the biggest impact of the quality and feel of your images (vintage lenses create some great looks, when you’re ready to dive down that rabbit hole). Most consumer DSLR/mirroless cameras can be supplied with a “kit” lens. These are usually cheaper than premium lenses, but won’t be weatherproof, so be careful if you’re using it in the rain. Kit lenses are generally zoom lenses, which is great when you are just starting out as it means you’ve got a range of focal lengths covered so you can experiment, be flexible and have fun with your images. The Canon 18-55mm f/4.5-5.6 is a common kit lens that you can buy with their cameras. Just be sure the check that the lens is included in the price that you pay, as a general rule, DSLR/Mirrorless cameras don’t come supplied with a lens and you’ll have to buy this separately.

New or Secondhand?
This is a question that is likely to be dictated by your budget, but you also get a lot more bang for your buck if you are willing to make a second hand purchase. The secondhand camera market is huge and there are some bargains to be had if you know where to look. The best places to start this search are websites like MPB and Wex.
Both of these sellers are reputable UK brands who supply the kit with a warranty and everything is thoroughly checked before it goes on their websites, so you can be sure you’re not throwing money away and buying a dud.
3 of the lenses in my current set-up were bought secondhand and haven’t caused me a single problem and have proven to be great value for money.
You can also consider places such as Facebook marketplace and eBay, but make sure that you do your research and don’t get either ripped off or scammed!
There is also a large “grey market” for cameras. I won’t post any links here, but I am sure you will be able to do a quick Google search and make up your own mind. With regard to the grey market for cameras, you’ll get an authorised product but outside of the manufacturers authorised distribution channels. So you might buy a lens from a UK based seller, but the product wasn’t intended for the UK or European markets, meaning you don’t get any of the manufacturers warranty protection if something goes wrong.
Will people take me seriously?
Don’t worry about what other people think. Use what works for you; the most important thing is that you ‘get on’ with your setup. That being said, if you get booked to photograph a wedding and turn up with an iPhone and nothing else, you’re going to get some funny looks!
“Is this a professional camera?”, another question that gets asked repeatedly and one that doesn’t have a really well defined answer. Any camera can be a professional camera if you’re using it to make money. What portion of your income you need to be making to be considered professional is another discussion for another time! Also worth noting at this juncture, if you’re out shooting and you end up on private land (such as Canary Wharf in London or the area around Tower Bridge), you’ll probably told by a security guard that any camera that has an interchangeable lens is a professional camera so that they can make you stop and move you on (always be polite and do what they ask, it makes it easier for everyone else who has to encounter them in the future); luckily, you’ll probably have another camera in your pocket anyway.
So, does gear matter?
Yes.
And no.
And also maybe. To some extent.
If you’re reading this and you have made it this far, chances are you’ve read a few articles on this topic and heard a number of different opinions.
If you have a camera on your phone and you’re happy with it then great! If you want some more flexibility in what you do then you may want to consider your first DLSR/mirrorless purchase.
Gear matters if you let it matter. Going out and buying a Canon R5 with an L series lens is going to set you back in excess of £6500 and isn’t going to make you a better photographer, no matter what your experience level. It will create lovely files with lots of data that will be great to edit, but they won’t necessarily be “good photos”. If you’re spending this kind of money on your first camera because “it will encourage me to go out and shoot” then the chances are that in 6 months time you’re going to have a very expensive ornament sat on your shelf! Remember the old adage that photography happens in the space between the photographer’s ears.
The resolution/megapixel count on newer cameras is huge, which is great if you’re drastically cropping images and want to retain the image quality. But bear in mind, that if you’re after the resolution, then consider the Canon 5DS or 5DSR. Both of these have more megapixels (50.3MP) than the R5 and are now about 8 years old so can be found for about £5000 less than the newer cameras.
What matters most is that you’ve got a setup that works for you and that you can use easily, confidently and that allows you to be out there making photos. You can’t make images if you don’t get out to take them!