
What’s wrong with my photo?
A beginner's guide to reviewing your images after your shoot and diagnosing what’s not quite right in the bad ones!
So you’ve got your camera and you’ve chosen a lens, you’ve read my blog about the exposure triangle and you have taken some of the information from 10 Things I Wish I Knew as a Beginner Photographer, you’ve been out on your first shoot and now you’ve had a look at the images in your editing suite of choice.
You’ve managed to secure a few shots that you’re really happy with and you’ve got a few others that have got issues, they might be blurry or noisy or out of focus. You know there’s something that you should have done differently, but you’re not sure what changes you need to make.
We’re looking at some technical stuff in this one, some of which will be specific to your camera so you might want your camera and its instruction manual to hand when you’re reading this. An open YouTube tab might be handy as well.
This blog is going to aim to show you some common mistakes, what they look like and what you can do to stop it from happening again!

Blurry Images.
This image was taken at night, outside my old flat in London and it’s blurry. Really blurry.
There are different kinds of blur in photography, but the two we see most of in camera are motion blur (where the subject is moving) and camera movement (where the camera has moved as you take the shot).
This image hits the jackpot as it has both! The tree is blowing in the breeze and the camera has moved as I have taken the shot.
So what’s caused this?
There’s a couple of issues here, both related to the amount of light available. It’s a night shot, so lots of light needs to hit the sensor to properly expose the shot. To let enough light into the camera means the shutter needed to be open longer. In the case of this image, the exposure length was 0.5seconds which isn’t massively long, but certainly long enough to cause the issues that we can see.
This image was also taken hand held, i.e. not on a tripod and without a shutter release cable. When I pressed the shutter, the camera moved and in the 0.5 seconds the shutter was open, I also moved and as a result the camera moved even more. It was also a windy night, so in the same 0.5 seconds, the wind has blown the tree and this has been recorded as blur by the camera’s sensor.
As a general rule of thumb, if your shutter speed is longer than the focal length you are using, your camera should be on a tripod. So for example, if you are shooting at 50mm and to correctly expose the shot you need a shutter speed of (for example) 1/10 then you should be on a tripod.
There’s other things you could do as well that could be useful if you don’t have a tripod. You could try increasing the ISO - this would make your sensor more sensitive to the light, so you could reduce the shutter speed, but remember his could introduce noise to the image.
You could also try increasing the size of your aperture but remember, this could impact the sharpness of the image (lenses are usually sharpest towards the middle of their aperture size) and will have an impact on the depth of field of your image. This shot was taken at 50mm with a shutter speed of 1/50th of a second and an ISO of 100 - I could have increased the the ISO but it would have introduced too much noise into the image so the tripod would have been the best way to go here.
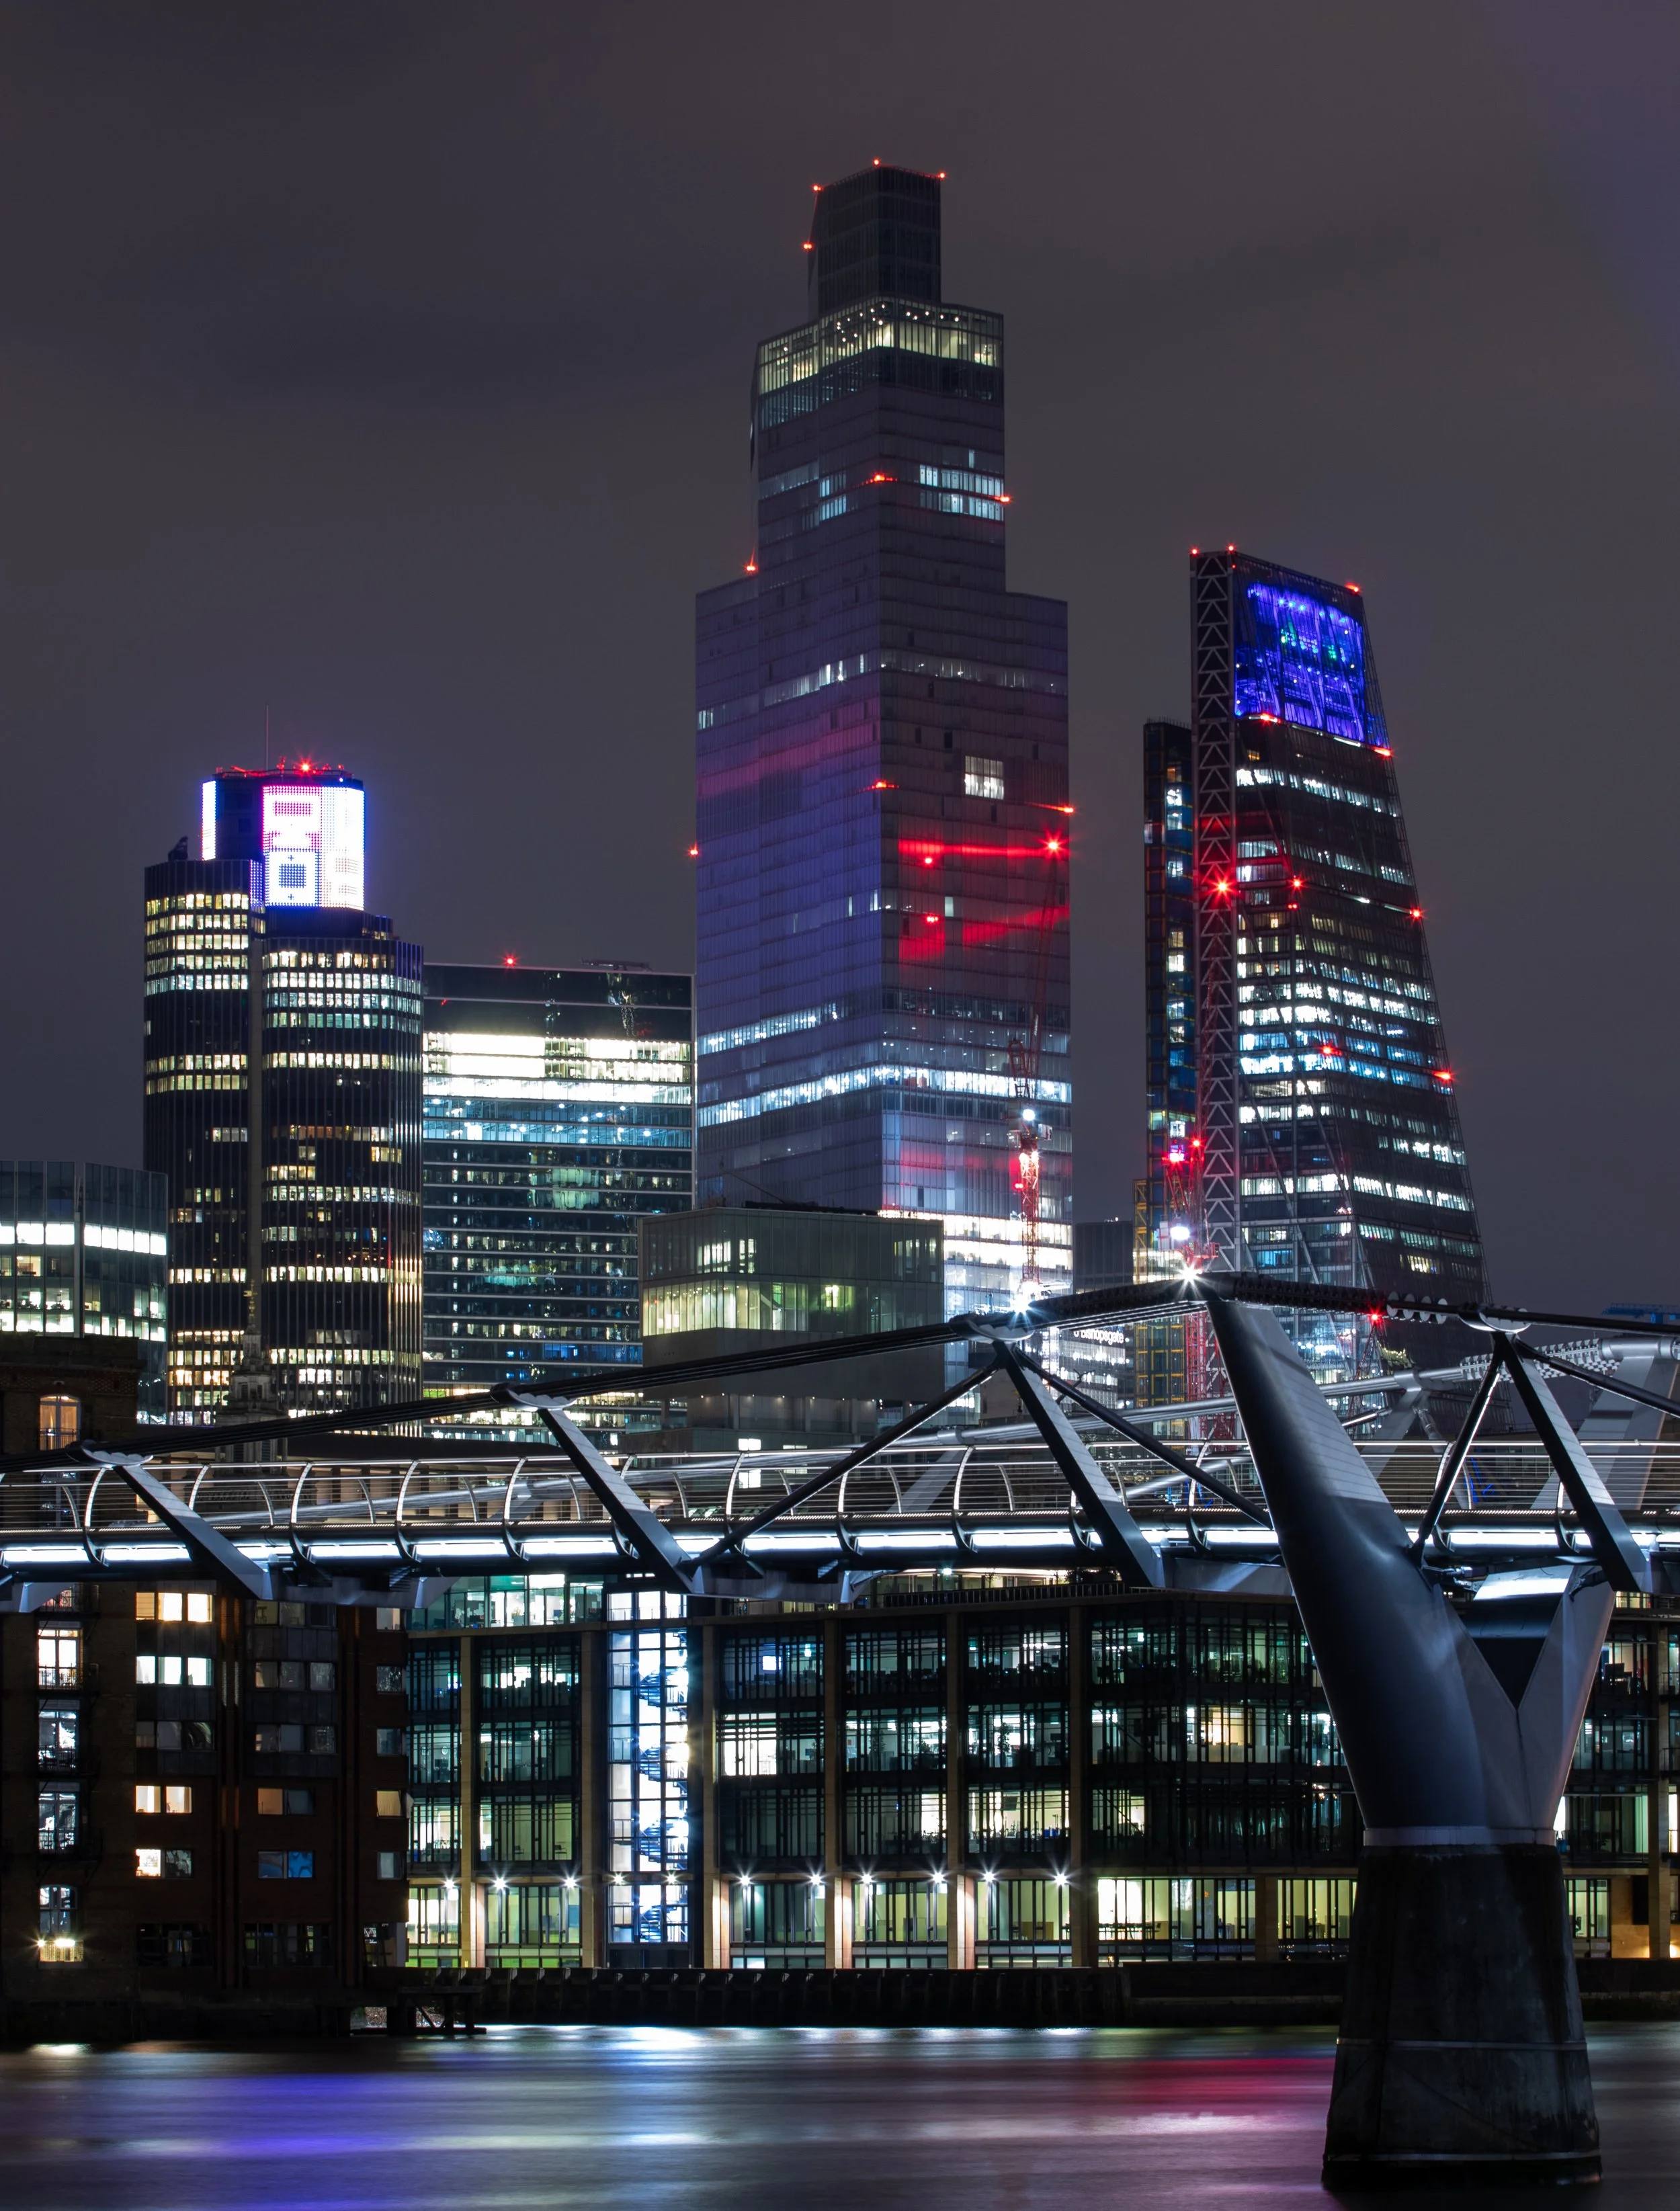
By contrast, the skyline shot above was a 30 second exposure, 15 times longer than the night image of the tree and the house, and the whole thing is pin sharp. It was shot at f/8 with an ISO of 100 at 70mm so the above rule regarding focal length and shutter speed comes into play here; this would have been impossible without a tripod!
Underexposed and Over Exposed Images.

The image on the left is one that we would use the phrase “blown out” to describe the sky. The shutter has been open for too long.
This means that when this image was taken, the shutter was open for so long that enough light hit the sensor to “overload” the photosites that it’s made from.
This means that effectively, no data has been stored in them, there is no detail there and the image shows a patch of complete white. No amount of editing is going to sort this out unless you replace the sky in Photoshop.

By contrast, the image on the right is under exposed, so the opposite is true. The shutter wasn’t open for long enough to let sufficient light into the camera to hit the sensor and so the photosites on this image are black, but this presents the same problem - there is no data present in those parts of the image.
Fortunately, the solution to under and over exposed images is simple and doesn’t require any extra kit to solve it (unless of course you are needing such a long exposure that you need to crack out the tripod). It pays to get this right in camera!
An over exposed image needs a shorter exposure time and an underexposed image needs a longer exposure time.
You should always check your exposure using the light meter which is built into your camera making sure it’s as close to the centre as possible.
You can also turn on the zebra stripes/similar in your camera. Check the manual to see how to do this, but the premise is simple, if you have over/underexposed areas of your image, the LCD screen will flash to show where the problem areas are. This a great way to see these areas at a glance and its really helpful when you’re starting out if you don’t know how to read your histogram or aren’t confident with the light meter.
But what about images that high dynamic range, and what is high dynamic range?
Images that have high dynamic range have really bright elements and really dark elements in them. You can often find these sorts of scenes at sunrise and sunset whilst the sun is rising/setting and parts of the scene are falling into darkness or haven’t been lit up in the morning light yet.
There is a way around this, and it’s called exposure bracketing. To do this, you need to take a correctly exposed image, an under exposed image and an over exposed image (you’re going to be exposing for the highlights, shadows and “midtones” in the respective images). Most cameras have this function built into them, and it will be called Automatic Exposure Bracketing (AEB) and you should consult your manual to see how to do this with the model of camera that you have. Once you’ve got this set up, you can capture the images and then blend them in either photoshop or Lightroom to get yourself an image that is perfectly exposed! In most models, if you change the shooting mode to “burst” it will take all three images without you having to touch the camera and risk introducing any movement into the image.

Spots
More precisely, sensor spots! I have highlighted some of the ones in the image to the left although they’re already quite small and the size of this image isn’t helping, but they’re there! If you look closely, you will find even more.
These aren’t uncommon, especially if you’re changing lenses a lot and if you’re not changing them in a way that can help to prevent it.
The good thing is that they are easy to deal with using the clone stamp and/or spot removal tool in photoshop and/or the clone tool in Lightroom, depending on what you prefer. Both programmes will provide good results.
Whilst these are easy to get rid of, if there is a lot of them in your image then they can be time consuming and you always find more when you start to look for them. You might also find that they appear in some images and not in others, even though they were taken seconds apart. This is because the focal length you are using and the aperture size you are using can impact how many, if any at all, appear in your image.
These tiny, yet terribly irritating blemishes are caused by tiny dust particles settling on your camera’s image sensor and are easy to prevent and minimise if you do a couple of things . Firstly, never leave your camera without either a lens or or a body cap over the mount. This prevents the sensor being exposed to the open air and dust.
Secondly, whenever you are changing the lens on your camera try to have it pointed with the lens mount facing the floor. Dust tends to fall down and not up, so by doing this, you minimise the risk that you are exposing your sensor to. The more you change lenses, the easier this task will become as you build up some muscle memory.
You should also make sure that you keep your sensor clean. You can do this, or your can pay someone to do it for you. It’s not a difficult process, but it is a very delicate one and you’ll need a steady hand. If you’re not confident in your own ability to do this then most good, local camera shops will have a sensor cleaning service. You can buy packs of sensor cleaning swabs on Amazon and they are fairly cheap. I have linked the ones that I like to use here. You’ll pick a whole pack of these up for less than half the price of a sensor cleaning service in a shop but be warned that if you cause any damage to the sensor, you have set yourself up for a pricey repair and in extreme cases, you could completely write off your camera.
Always consult the manual for your camera and the manufacturers instructions for cleaning your sensor prior to having a go at doing it for your self.

Soft Images
Or, in the case of the image to the right, soft subjects.
When we talk about soft images, what we are talking about is an image which is out of focus. Or at least the subject of the image is out of focus or “soft”.
In the image of Chaffinch on the right is out of focus, or at least the subject is. What we have is an image where the camera has focussed on the wrong part of the image, you will see that the grass and debris in the back ground is much sharper!
The grass in the foreground is also out of focus, but in a shot like this (were the subject in focus!), could actually be desirable and help to draw the eye to the subject, but as we don't have the focus in the correct place, this is a moot point.
This image is unusable and unrecoverable. Were this the only shot of this bird I had, it may have been disappointing but fortunately, I managed to get one that was in focus!
Thankfully, again, this isn’t a difficult one to sort out, but the way in which you go about it is something which is going to be partially dependent on your camera brand and you’ll need to consult the manual, or YouTube to get the right settings.

You will need to familiarise yourself with the different autofocus modes in your camera, and make sure that you have the focussing indicators turned on so that you can see, through your viewfinder, or LCD screen exactly where the camera is focussing. This will help you in most cases to ensure that you are nailing the focus on the subject.
The autofocus in many newer cameras is powerful enough to detect the subject, recognise what type of subject it is and focus on it, if you have an older camera, you won’t have this luxury so you’re going to need to practice.
The image above was also shot at an aperture of f/4, which means that the depth of field is quite shallow, stopping down to f/8 might have help to save this image and given a deeper depth of field with more of it in focus, but this would have also mean slowing down the shutter to a speed which isn’t practical for shooting faster moving subjects.
If you’re shooting fast moving subjects like birds or sports, then you also might want to explore back button focus as this can make your life a bit easier - again, the way in which your camera is able to do this is going to depend on the make and model so consult the manual and consider watching some model specific videos on YouTube which will show you how to do this.
It can be slightly different in landscape photography and still life photography, or indeed any other genre where your subject is moving very slowly, or not moving at all, as you are likely to be using manual focus. The rubber duck above was shot in a studio using manual focus and a smaller aperture to give a greater depth of field.
Manual focus gives you complete control over where you focus and how you focus, within the limitations of your equipment and settings. When you have focussed your image, use the functions on your lCD to zoom in and check that you are completely pin sharp! You could also turn on focus peaking if your camera supports it as this will give you a further visual signal as to if/when your subject is in focus.
With any discussion about focus, we should remember that lenses have limitations. They have a minimum focus distance (how far away a subject should be before the lens is physically able to focus on it) so you’ll need to be in the right place to get the subject to be “focusable”. You’ll find this information printed on the lens you are using. You can also use the tools in PhotoPills to help you calculate hyper-focal distances. This can be quite complicated, so work on the basics first and then about going down this rabbit hole!

Grainy/Noisy Images
Sometimes, when you get your photos into Lightroom, you will be able to see that they have a kind of texture to them, almost like they have been printed on sandpaper.
What we’re dealing with here is digital noise, which is introduced into images when the ISO setting is cranked up, this amplifies something called “photon shot noise”in your image which leads to the grainy feel that you can see in the grass in the image on the right hand side.
This is one of the easiest things in this list to sort out, you just need to know your camera and be familiar with how well it deals with high iso. For example, on my Canon 80D, I know that I can get the ISO up to around 6400 before the grain starts to become an issue, but this varies from camera to camera, there is no hard and fast rule. You will need to do some experimenting to find out where the red line for you is and how much grain you are willing to accept in your images.
Remember that if you reduce your ISO, you will need to adjust shutter speed and/or aperture to compensate for this. If you are working at higher ISO’s then you really need to nail the exposure in the camera, as if you try increasing the exposure too much in Lightroom you’re really going to exacerbate any noise in your image and could end up with something that is unusable.
The other way that you can deal with some noise is in post production. The latest version of Lightroom has a noise reduction function built into it and this is pretty good at removing noise, but the trade off is that you can end up with images that look a but un-natural if you use it too much or if there was a tremendous amount of noise in the image to begin with. Other tools which can do this are available, but you need to be aware of the same issue and you should check the cost of these bits of software too!
To wrap up, understanding and avoiding common photography pitfalls is all part of the journey to improving your craft. With a bit of practice and attention to detail, these issues become easier to spot—and even easier to fix. As with most things, it comes with practice, and sometimes a lot of patience.
If you’ve found this guide helpful or have any questions about your own photography challenges, I’d love to hear from you! Feel free to drop me an email, or connect with me on Instagram and Facebook for more tips, inspiration, and behind-the-scenes content. Happy shooting!