Focus Stacking: How to Get Sharp Images in Landscape Photography
Sharpness. It’s a hot topic in photography and it’s never going to of away. We all pixel peep whether we admit to it or not, and not just for our own photos.
However, there are limitations to our equipment, even the very best, most expensive lenses can only achieve so much sharpness - you can’t beat physics, you just have to adapt to it. You can come close. Coming close is expensive, and expensive will only get you most of the way. Sometimes we just have to work with what we’ve got and that usually involves using our computer and some editing software.
For this one, we’re going to be using Photoshop, as it’s the easiest and quickest way for us to get the results we want.
What is Focus Stacking?
A good starting point for this would be to look at my blog on exposure blending if you’re not sure about it and then come back and finish this off. If you’re already au-fait with exposure blending/stacking then read on!
Focus stacking helps us to ‘remove’ some of the limitations of our lenses. Even at their sharpest f/stop, there are parts of the image (often the corners), that aren’t as sharp as we would like them to be. With focus stacking, we can take several different exposures of the same subject, with different focus points, usually working from the front of the image to the back and then we can blend them together in Photoshop which creates one image which is sharp across its whole area.
How Do You Focus Stack?
The first thing you need to do is to take your images. I am going to use an example which I have taken in the studio, for the simple reason that this is the place that I have the most control over as much of the process as possible. I’m going to be shooting tethered using capture one, but the process you will go through will be exactly the same, be it in the studio or out in the field. The major difference is that when you/I are working out in the field, instead of being in the warmth of the studio and working on a nice big monitor, we’re often out in poor conditions and working on the ‘tiny’ screen on the back of the camera.
Essentially, what we’re going to do is take at least 3 different exposures. In the first image, we are going to make sure that our foreground, or the front of our object is in focus, in the second image, we are going to focus on the mid ground and then finally, we are going to focus on the back of the image; this will either be the back of your object in the studio, or on infinity if you are out in the field. I have tried to visualise this for you in the image below.
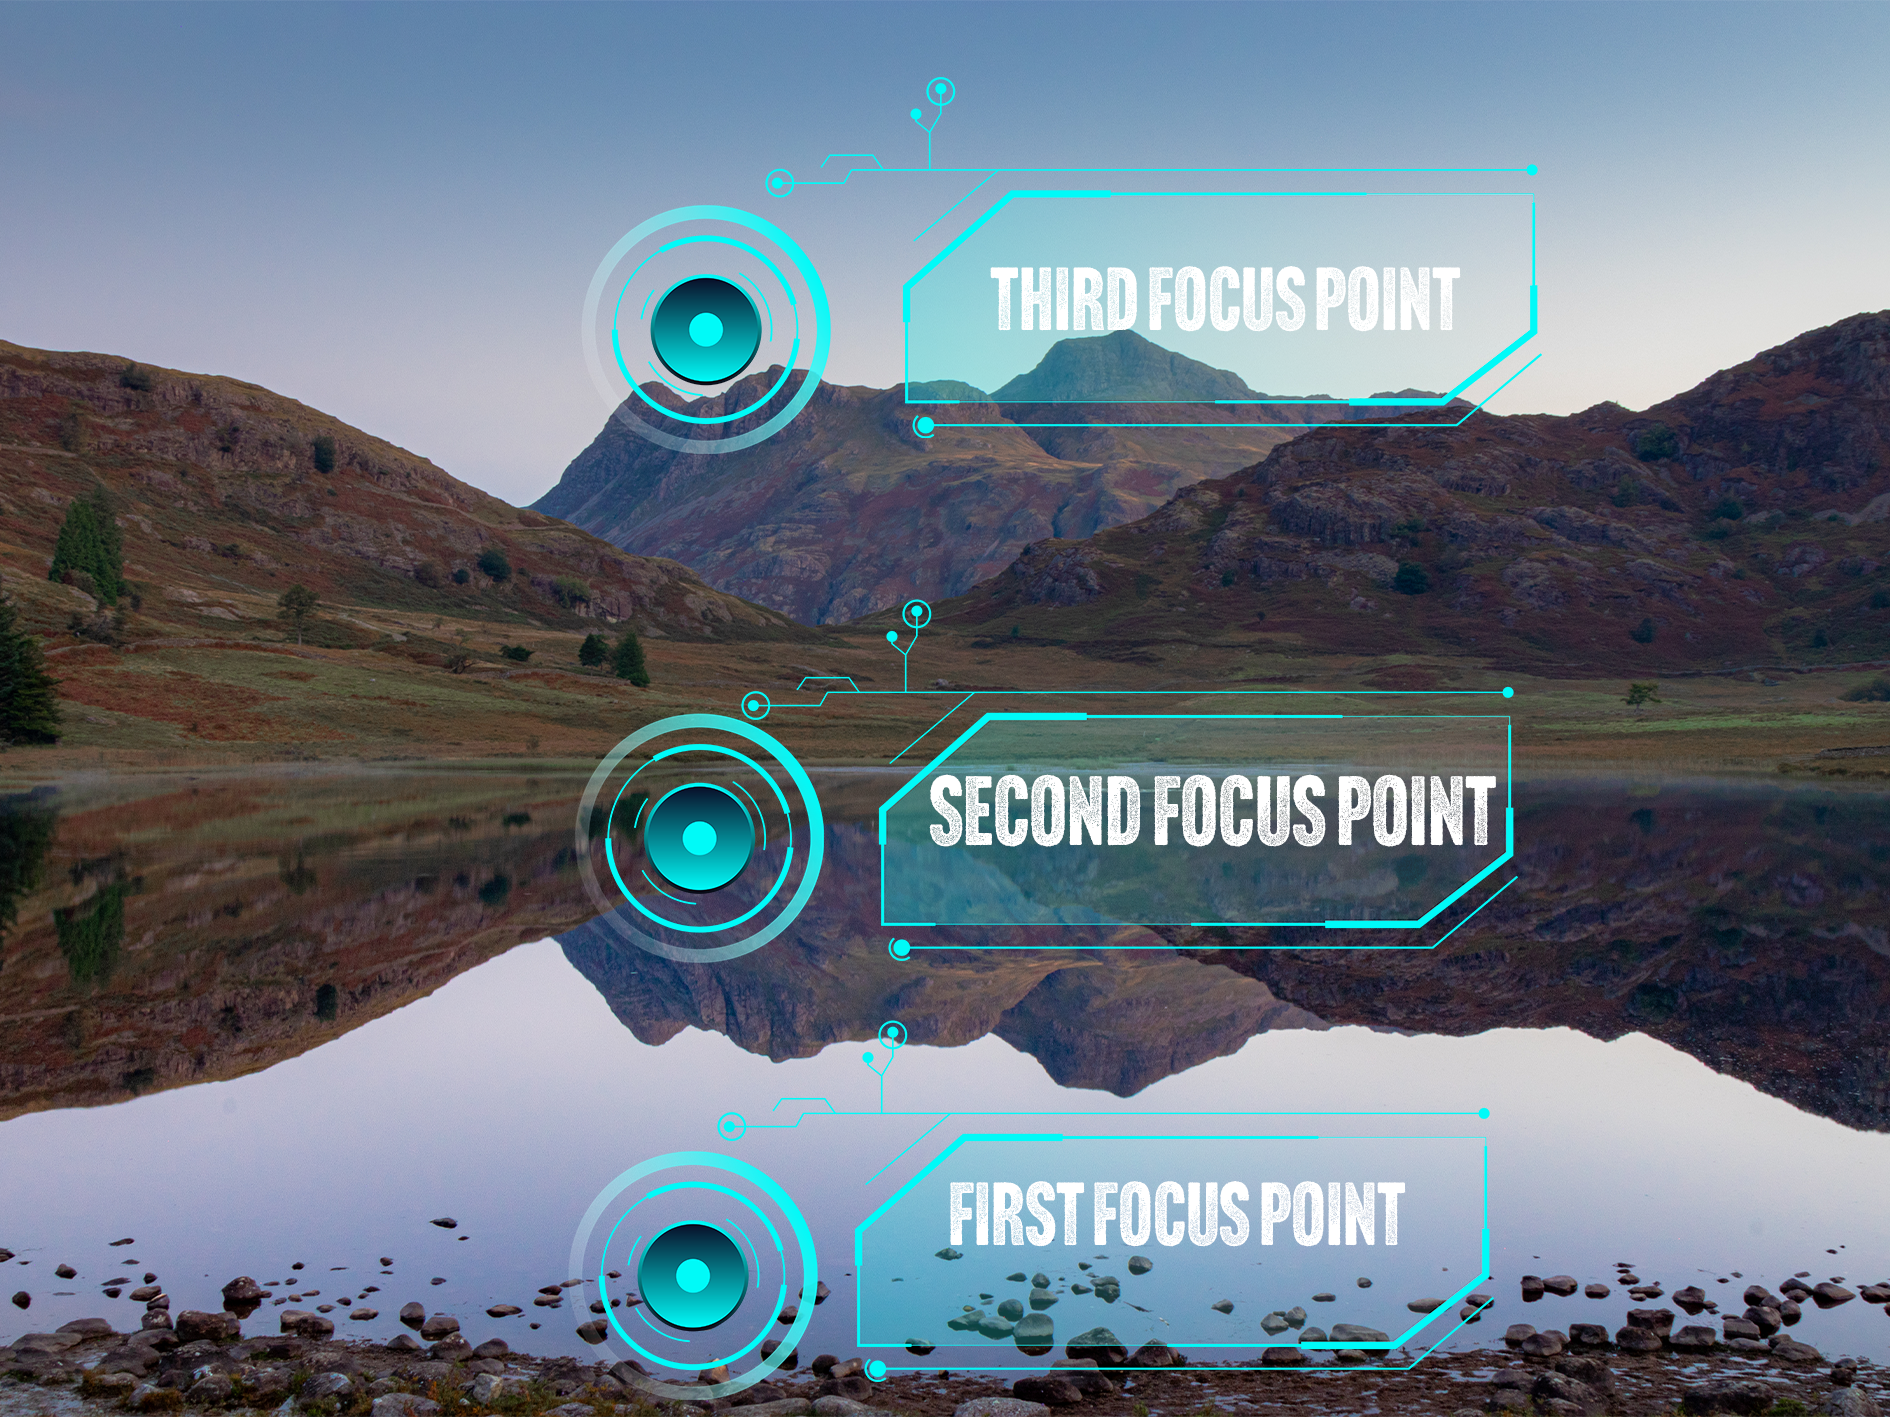
This image shows where your (minimum) 3 focus points will be when you are shooting images for an exposure stack.
How many shots you need is going to be influenced by what you are shooting and what you are shooting on, what f/stop you’re at and if there is any movement in your scene. Three exposures is a good rule of thumb for this type of photography, if you take too many images, this can start to complicate things in post processing and your image can end up looking strange, have weird artefacts in it when your exposures are blended or simply, it just won’t work!
The other thing to remember is that you need to keep your settings locked in. If you start to change the settings on your camera between each exposure, this can cause issues and slow down the process.
Finally, you need to (99.9%) of the time, do this on a tripod. You want your exposures to line up exactly between shots, if they don’t, guess what… more complications!
So you’re set up, you’ve got your shot framed and you’re ready to start shooting. The next phase of this is going to be dependent on the camera you have. A lot of newer Canon camera’s have a focus stacking setting built into them. You will need to consult your camera’s manual for instructions on how to do this, but you can tell it how many images you want in the stack and how much you want the focus to shift between each image. The other way of doing it, and the way I am going to describe in this blog (because my camera doesn’t have the focus stack function!) is manually, using either manual or autofocus.
This is fairly straightforward.
1) Frame up your shot and select your settings.
2) Focus on the foreground by either twisting your focus ring, or tapping the screen to select a focus area and half pressing the shutter button. Check the focus is sharp and capture your image.
3) Repeat step 2 for the midground.
4) Repeat step 2 for infinity/background.
I always find it useful to grab an exposure which has my hand in front of the lens after I have completed each ‘stack’.
You can take as many stacks as you like whilst you’re out and about, but keeping them organised whilst you are working and before you get into post will make your life a lot easier in the edit.
How to Create a Focus Stack in Lightroom and Photoshop.
I have shared a video below which explains this process in full, but the first thing you are going to want to do is import your images into Lightroom.
Once they are in Lightroom, edit your first image and get it looking the way you want it. Once you have done this, you want to copy the settings from you first image to the other two in you stack, so that they all have the same adjustments applied to them. I usually just make some global adjustments at this stage and do anything local on the image I get out of Photoshop. You can see this process in the video below. You can make your adjustments in Camera Raw in Photoshop, but I find the process of copy and pasting the adjustments in Lightroom much easier.
Once you’ve done this, you need to select your three images and then right click and ‘open as layers in Photoshop’. When you’ve done this, you can move on to the next stage.
Now your images are in Photoshop, the process is pretty straightforward; you’re going to shift click to select all three images, the in the edit menu, we’re going to select “auto align layers”. This will make sure that our images are neatly stacked on top of each other. Leave the ‘Auto’ option checked and click OK.
Once this has completed, make sure that the three layers are still selected, go back into the ‘edit’ menu and select “auto blend layers”. Make sure that “stack” is selected and then I always keep “seamless tones and colours” and “Content aware fill transparent areas” are checked. The latter will fill any transparent areas (usually around the edges) that have been created when your images were aligned.
Now that Photoshop has done it’s thing you will see that it has created masks on each of your layers, and if it’s worked well, you should see that the masks are broadly letting the focussed areas of each shot show through. If you need to fine tune these masks, you can do this using either a white or black brush and painting on the respective mask.
The final step is to check that you are happy with what you have, that it’s sharp where you want it to be, and that’s the process done!
All you need to do now is hit save, and if everything is working well, you should see it appear back in Lightroom as a .tiff file that you can now make some local edits on and get it looking exactly how you want it!
I have made a video of this whole process below, so you can see each step and hear some commentary that I hope you’re able to follow along with!
Step By Step Focus Stacking Video Tutorial
Check out my YouTube video on focus stacking - please head over to the channel and subscribe!
Original Images:


I set this up on the studio against a yellow backdrop and one light source (just a video light for this for the sake of speed), this is just three props I found amongst some old props in the studio - a lego mini-figure, a pocket watch and a Funko figure. I set these up in a line extending away from the camera. These images were shot at f/4, just to force the depth of field to clearly illustrate what I am trying to demonstrate. You should be able to see the three focus points by looking at which part of the image in focus, you should be able to see each subject in sharp focus as the focus point moves towards the back of the image.
Whilst I have done this in the studio to illustrate it, the process in the field is exactly the same. The only thing you might find is that when you’re not in a controlled environment, you’re much more likely to have changes in light and the position of your camera to deal with.
After following the process outlined above, all three images are combined to produce the final, stacked and fully focussed image you see below:

I hope that you have found this useful, I am trying to put some more of this type of content together and will eventually get them uploaded to my Chris Kendrick Photography YouTube Channel so you can digest them at your leisure.
If you have found this useful, I’d be grateful if you would like to support the blog and help me keep producing Lake District photography content, honest gear reviews and regular website updates, you can do so via my Buy Me a Coffee page. Keeping everything running smoothly takes time, and your support makes a real difference. Thank you.
Check out some more of my latest blog posts below…